
MongoDB分片
什么是MongoDB分片?
就是把数据库拆分,把所有的数据分散存放到不同的服务器上的过程为什么要实现MongoDB分片?
为了解决数据的不断增加的方法 垂直扩展:增加CPU、硬盘等存储资源来扩展容量 水平扩展:将数据分布在多个服务器上,也就是会使用到分片技术 - 对集群进行抽象,让集群“不可见”,MongoDB自带了一个叫做mongos的专有路由进程 - 解决磁盘存储空间的问题,提高数据处理的性能 - 提高数据的安全性,保证集群总是可读写,将MongoDB的分片和复制功能结合使用,在确保数据分片到多台服务器的同时,也确保了每分数据都有相应的备份,这样就可以确保有服务器换掉时,其他的从库可以立即接替坏掉的部分继续工作 - 使集群易于扩展分片集群中的主要组件:
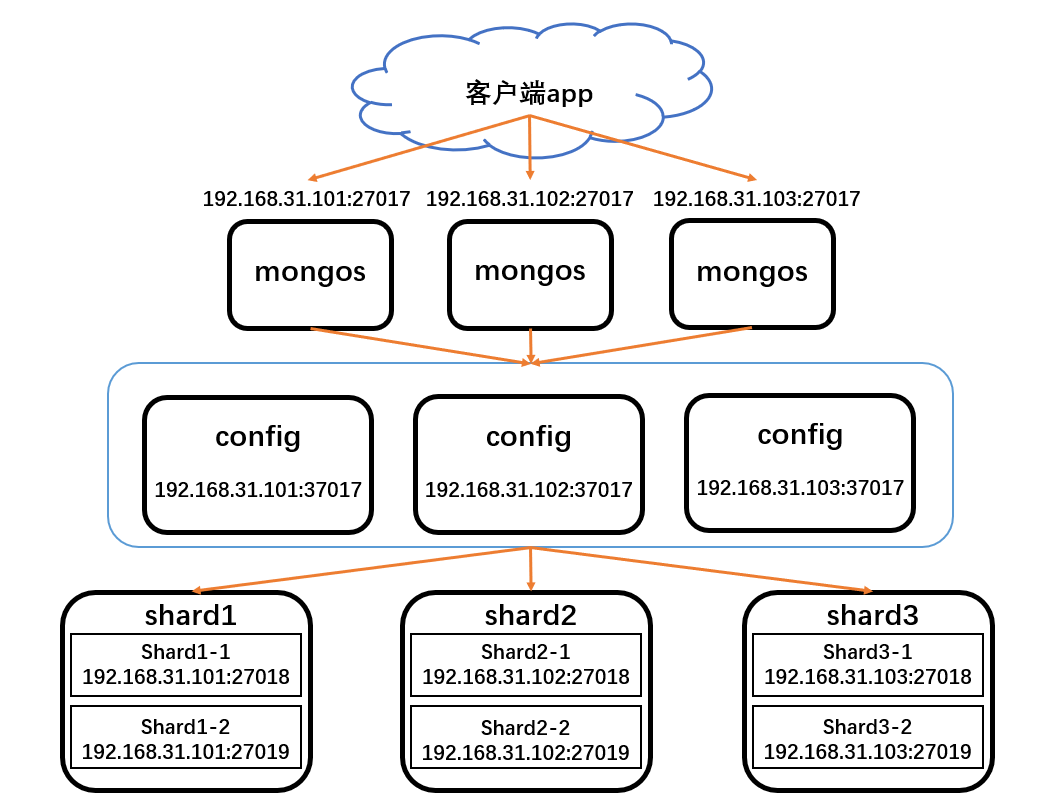
mongos : 数据路由,用于对外应用访问,数据迁移和数据自动均衡
config : 存储记录集群所有节点和所有存、取数据的方式,所有shard节点的信息,分片功能的一些配置信息
shard: 真正的数据存储位置,以chunk为单位存数据
一、MongoDB分片群集搭建
★准备工作★
一共需要3台服务器,配置12个实例
mongs:192.168.31.101:27017、192.168.31.102:27017、192.168.31.103:27017
config:192.168.31.101:37017、192.168.31.102:37017、192.168.31.103:37017
shard1:192.168.31.101.27018、192.168.31.101.27019
shard2:192.168.31.102.27018、192.168.31.102.27019
shard3:192.168.31.103.27018、192.168.31.103.27019
安装包:mongodb-linux-x86_64-rhel70-4.0.28.tgz
配置环境如下图所示:
安装MongoDB和配置群集认证
注意:因为三台服务器的架构都一样所以操作都一样
1.三台服务器都要安装MongoDB,以及创建各个实例的数据存储、日志、pid文件和配置文件存放等目录以及日志文件
192.168.31.101、192.168.31.102、192.168.31.103:
yum -y install openssl-devel
tar zxf mongodb-linux-x86_64-rhel70-4.0.28.tgz
mv mongodb-linux-x86_64-rhel70-4.0.28 /mongodb
mkdir -p /mongodb/{config,shard1,shard2,logs,run,conf}
touch /mongodb/logs/{mongos.log,config.log,shard1.log,shard2.log}
config、shard1、shard2用于各实例的存放数据的data目录,mongos没有数据,所以不需要创建配置dbpath
2.配置群集认证
注意:随机在一台服务器上创建keyfile文件,然后拷贝到其他服务器上的相同路径上
192.168.31.101:
touch /mongodb/run/mongo-keyfile
openssl rand -base64 164 > /mongodb/run/mongo-keyfile
chmod 600 /mongodb/run/mongo-keyfile
会生成164位的加密字符串
cat /mongodb/run/mongo-keyfile
---------------------------------
rC3H7VCXtBfrrVFVo/cxgbpgGwAfx6Jw3+Zeb7DGQYloVTj7AxIMvTIOnZX746CK
LuG7AvTm1FdbVFgrfOfVP5lZkaYVcKwP3xr0W+/8vM6tTORitSWdSESm+fGyih/Q
YfHkrW78CH5peEGU7XKsI9xl8rSq8iOFZAjUlz9f7sW/aduw1OPDnbQ//zWSlgdI
tOdHzAPJY4Sa3eJ2Gs03olPSWss=
把该文件拷贝到192.168.31.102和192.168.31.103服务器配置的keyFile目录下即可
配置安装config和shard实例
1.配置config配置文件
注意:因为三台服务器的架构都一样所以操作都一样
192.168.31.101、192.168.31.102、192.168.31.103:
vim /mongodb/conf/config.conf
-----------------------------------
port=37017
bind_ip=0.0.0.0
dbpath=/mongodb/config
logpath=/mongodb/logs/config.log
logappend=true
pidfilepath=/mongodb/run/config.pid
fork=true
maxConns=5000
storageEngine=wiredTiger
replSet=config
configsvr=true
clusterAuthMode=keyFile
keyFile=/mongodb/run/mongo-keyfile
2.配置shard配置文件
注意:这里以192.168.31.101为例
配置shard1(192.168.31.101:27018)实例配置文件
vim /mongodb/conf/shard1.conf
--------------------------------
port=27018
bind_ip=0.0.0.0
dbpath=/mongodb/shard1
logpath=/mongodb/logs/shard1.log
logappend=true
pidfilepath=/mongodb/run/shard1.pid
fork=true
maxConns=5000
storageEngine=wiredTiger
replSet=shard1
shardsvr=true
clusterAuthMode=keyFile
keyFile=/mongodb/run/mongo-keyfile
配置shard2(192.168.31.101:27019)实例配置文件
vim /mongodb/conf/shard2.conf
--------------------------------
port=27019
bind_ip=0.0.0.0
dbpath=/mongodb/shard2
logpath=/mongodb/logs/shard2.log
logappend=true
pidfilepath=/mongodb/run/shard2.pid
fork=true
maxConns=5000
storageEngine=wiredTiger
replSet=shard1
shardsvr=true
clusterAuthMode=keyFile
keyFile=/mongodb/run/mongo-keyfile
因为这里是以192.168.31.101这台服务器的mongodb实例演示,所以192.168.31.102和192.168.31.103两台服务器配置shard1和shard2的配置文件需要修改replSet参数,分别改成shard2和shard3,其他参数都可以不用变更
3.启动config、shard实例和配置副本集
启动所有config和shard实例
192.168.31.101、192.168.31.102、192.168.31.103:
/mongodb/bin/mongod -f /mongodb/conf/shard1.conf
/mongodb/bin/mongod -f /mongodb/conf/shard2.conf
/mongodb/bin/mongod -f /mongodb/conf/config.conf
查看启动状态
[root@mongo1 ~]# netstat -anptu |grep mongo
tcp        0      0 0.0.0.0:37017           0.0.0.0:*               LISTEN      1731/mongod
tcp        0      0 0.0.0.0:27018           0.0.0.0:*               LISTEN      1665/mongod
tcp        0      0 0.0.0.0:27019           0.0.0.0:*               LISTEN      1698/mongod
[root@mongo1 ~]# ps -aux |grep mongod |grep -v grep
root       1665  2.8  2.1 1115132 61120 ?       SLl  06:44   0:01 /mongodb/bin/mongod -f /mongodb/conf/shard1.conf
root       1698  2.6  1.9 1115128 54904 ?       SLl  06:44   0:01 /mongodb/bin/mongod -f /mongodb/conf/shard2.conf
root       1731  2.9  1.9 1115124 55608 ?       SLl  06:44   0:01 /mongodb/bin/mongod -f /mongodb/conf/config.conf
配置config实例副本集
注意:只用登录一台服务器的config实例即可
192.168.31.101:
/mongodb/bin/mongo --port 37017
创建config副本集
> cfg={"_id":"config","members":[{"_id":0,"host":"192.168.31.101:37017"},{"_id":1,"host":"192.168.31.102:37017"},{"_id":2,"host":"192.168.31.103:37017"}]}
{
	"_id" : "config",
	"members" : [
		{
			"_id" : 0,
			"host" : "192.168.31.101:37017"
		},
		{
			"_id" : 1,
			"host" : "192.168.31.102:37017"
		},
		{
			"_id" : 2,
			"host" : "192.168.31.103:37017"
		}
	]
}
> rs.initiate(cfg)
{ "ok" : 1 }
config:SECONDARY>
config:PRIMARY>
配置shard1和shard2实例副本集
192.168.31.101、192.168.31.102、192.168.31.103:
注意:这里以192.168.31.101为例,只用在登录shard1实例即可
/mongodb/bin/mongo --port 27018
创建副本集
> cfg={_id:'shard1',members:[{_id:0,host:'192.168.31.101:27018'},{_id:1,host:'192.168.31.101:27019'}]}
{
	"_id" : "shard1",
	"members" : [
		{
			"_id" : 0,
			"host" : "192.168.31.101:27018"
		},
		{
			"_id" : 1,
			"host" : "192.168.31.101:27019"
		}
	]
}
> rs.initiate(cfg)
{ "ok" : 1 }
shard1:SECONDARY>
其他192.168.31.102和192.168.31.102两台服务器登录shard1实例执行的时候把_id参数改成shard2和shard3,并且把ip地址变成192.168.31.102和192.168.31.102执行即可
注意:配置副本集的时候不要使用localhost地址,也就是127.0.0.1之类的,因为mongos去读取config服务时,有三台shard,就会无法识别
配置安装mongos实例
1.配置mongos配置文件
注意:因为三台服务器的架构都一样所以操作都一样
192.168.31.101、192.168.31.102、192.168.31.103:
vim /mongodb/conf/mongos.conf
-----------------------------------
port=27017
bind_ip=0.0.0.0
configdb=config/192.168.31.101:37017,192.168.31.102:37017,192.168.31.103:37017
dbpath=/mongodb/mongos
logpath=/mongodb/logs/mongos.log
logappend=true
pidfilepath=/mongodb/run/mongos.pid
fork=true
clusterAuthMode=keyFile
keyFile=/mongodb/run/mongo-keyfile
启动mongos实例
192.168.31.101、192.168.31.102、192.168.31.103:
/mongodb/bin/mongos -f /mongodb/conf/mongos.conf
2.登录随机一台服务器mongos实例
/mongodb/bin/mongo --port 27017
添加三台服务器创建的shard1、shard2、shard3集群
mongos> sh.addShard("shard1/192.168.31.101:27018,192.168.31.101:27019")
{
	"shardAdded" : "shard1",
	"ok" : 1,
	"operationTime" : Timestamp(1658235168, 7),
	"$clusterTime" : {
		"clusterTime" : Timestamp(1658235168, 7),
		"signature" : {
			"hash" : BinData(0,"NMI7vvtLAE9N3JKEXpaQbO/e5i4="),
			"keyId" : NumberLong("7122052307964919840")
		}
	}
}
mongos> sh.addShard("shard2/192.168.31.102:27018,192.168.31.102:27019")
{
	"shardAdded" : "shard2",
	"ok" : 1,
	"operationTime" : Timestamp(1658235182, 4),
	"$clusterTime" : {
		"clusterTime" : Timestamp(1658235182, 6),
		"signature" : {
			"hash" : BinData(0,"1kMaxupyZrLFft745a5Hn4WDJrU="),
			"keyId" : NumberLong("7122052307964919840")
		}
	}
}
mongos> sh.addShard("shard3/192.168.31.103:27018,192.168.31.103:27019")
{
	"shardAdded" : "shard3",
	"ok" : 1,
	"operationTime" : Timestamp(1658235193, 6),
	"$clusterTime" : {
		"clusterTime" : Timestamp(1658235193, 6),
		"signature" : {
			"hash" : BinData(0,"9drMbrd8qbUxbtNe4laoaVUpqxQ="),
			"keyId" : NumberLong("7122052307964919840")
		}
	}
}
3.登录随机一台服务器mongos实例创建root权限的账号
/mongodb/bin/mongo --port 27017
进入到admin库查看是否有权限查看数据库,没有的话就创建root权限的账号
mongos> use admin
switched to db admin
mongos> show dbs
mongos>  db.createUser({user:"admin",pwd:"123456",roles:["root"]})
Successfully added user: { "user" : "admin", "roles" : [ "root" ] }
mongos> db.auth('admin', '123456')
1
mongos> show dbs
admin   0.000GB
config  0.003GB
查看群集状态
mongos> sh.status()
--- Sharding Status ---
  sharding version: {
  	"_id" : 1,
  	"minCompatibleVersion" : 5,
  	"currentVersion" : 6,
  	"clusterId" : ObjectId("62d69cd7704c3430bf63cbf7")
  }
  shards:
        {  "_id" : "shard1",  "host" : "shard1/192.168.31.101:27018,192.168.31.101:27019",  "state" : 1 }
        {  "_id" : "shard2",  "host" : "shard2/192.168.31.102:27018,192.168.31.102:27019",  "state" : 1 }
        {  "_id" : "shard3",  "host" : "shard3/192.168.31.103:27018,192.168.31.103:27019",  "state" : 1 }
  active mongoses:
        "4.0.28" : 3
  autosplit:
        Currently enabled: yes
  balancer:
        Currently enabled:  yes
        Currently running:  no
        Failed balancer rounds in last 5 attempts:  0
        Migration Results for the last 24 hours:
                633 : Success
  databases:
        {  "_id" : "config",  "primary" : "config",  "partitioned" : true }
                config.system.sessions
                        shard key: { "_id" : 1 }
                        unique: false
                        balancing: true
                        chunks:
                                shard1	391
                                shard2	316
                                shard3	317
                        too many chunks to print, use verbose if you want to force print
其他服务器的mongos实例都可以通过创建的账号登录
/mongodb/bin/mongo -u admin -p '123456' --port 27017
测试结果
在数据库上启用分片攻能
mongos> use shard_test
switched to db shard_test
mongos> sh.enableSharding("shard_test")
{
	"ok" : 1,
	"operationTime" : Timestamp(1658239260, 3),
	"$clusterTime" : {
		"clusterTime" : Timestamp(1658239260, 3),
		"signature" : {
			"hash" : BinData(0,"i5S7DB8YaVICyicT+iBH10vKab8="),
			"keyId" : NumberLong("7122052307964919840")
		}
	}
}
mongos> db.name_test.find().count()
0
mongos> for(var i=1;i<=10000;i++)db.name_test.insert({age:i,name:"wangmazi",addr:"Beijing",country:"China"})
WriteResult({ "nInserted" : 1 })
mongos> db.name_test.find().count()
10000
mongos> db.name_test.find()
{ "_id" : ObjectId("62d6b970c03e14500167ac6b"), "age" : 1, "name" : "wangmazi", "addr" : "Beijing", "country" : "China" }
{ "_id" : ObjectId("62d6b970c03e14500167ac6c"), "age" : 2, "name" : "wangmazi", "addr" : "Beijing", "country" : "China" }
{ "_id" : ObjectId("62d6b970c03e14500167ac6d"), "age" : 3, "name" : "wangmazi", "addr" : "Beijing", "country" : "China" }
{ "_id" : ObjectId("62d6b970c03e14500167ac6e"), "age" : 4, "name" : "wangmazi", "addr" : "Beijing", "country" : "China" }
{ "_id" : ObjectId("62d6b970c03e14500167ac6f"), "age" : 5, "name" : "wangmazi", "addr" : "Beijing", "country" : "China" }
{ "_id" : ObjectId("62d6b970c03e14500167ac70"), "age" : 6, "name" : "wangmazi", "addr" : "Beijing", "country" : "China" }
{ "_id" : ObjectId("62d6b970c03e14500167ac71"), "age" : 7, "name" : "wangmazi", "addr" : "Beijing", "country" : "China" }
{ "_id" : ObjectId("62d6b970c03e14500167ac72"), "age" : 8, "name" : "wangmazi", "addr" : "Beijing", "country" : "China" }
{ "_id" : ObjectId("62d6b970c03e14500167ac73"), "age" : 9, "name" : "wangmazi", "addr" : "Beijing", "country" : "China" }
{ "_id" : ObjectId("62d6b970c03e14500167ac74"), "age" : 10, "name" : "wangmazi", "addr" : "Beijing", "country" : "China" }
{ "_id" : ObjectId("62d6b970c03e14500167ac75"), "age" : 11, "name" : "wangmazi", "addr" : "Beijing", "country" : "China" }
{ "_id" : ObjectId("62d6b970c03e14500167ac76"), "age" : 12, "name" : "wangmazi", "addr" : "Beijing", "country" : "China" }
{ "_id" : ObjectId("62d6b970c03e14500167ac77"), "age" : 13, "name" : "wangmazi", "addr" : "Beijing", "country" : "China" }
{ "_id" : ObjectId("62d6b970c03e14500167ac78"), "age" : 14, "name" : "wangmazi", "addr" : "Beijing", "country" : "China" }
{ "_id" : ObjectId("62d6b970c03e14500167ac79"), "age" : 15, "name" : "wangmazi", "addr" : "Beijing", "country" : "China" }
{ "_id" : ObjectId("62d6b970c03e14500167ac7a"), "age" : 16, "name" : "wangmazi", "addr" : "Beijing", "country" : "China" }
{ "_id" : ObjectId("62d6b970c03e14500167ac7b"), "age" : 17, "name" : "wangmazi", "addr" : "Beijing", "country" : "China" }
{ "_id" : ObjectId("62d6b970c03e14500167ac7c"), "age" : 18, "name" : "wangmazi", "addr" : "Beijing", "country" : "China" }
{ "_id" : ObjectId("62d6b970c03e14500167ac7d"), "age" : 19, "name" : "wangmazi", "addr" : "Beijing", "country" : "China" }
{ "_id" : ObjectId("62d6b970c03e14500167ac7e"), "age" : 20, "name" : "wangmazi", "addr" : "Beijing", "country" : "China" }
Type "it" for more
再创建第二个库插入数据
mongos> use shard_test2
switched to db shard_test2
mongos> sh.shardCollection(shard_test2.name_test2)
2022-07-19T10:09:11.957-0400 E QUERY    [js] ReferenceError: shard_test2 is not defined :
@(shell):1:1
mongos> sh.enableSharding("shard_test2")
{
	"ok" : 1,
	"operationTime" : Timestamp(1658239768, 4),
	"$clusterTime" : {
		"clusterTime" : Timestamp(1658239768, 4),
		"signature" : {
			"hash" : BinData(0,"7xcZjC4XSyjTikAo7XxLOxkUzQQ="),
			"keyId" : NumberLong("7122052307964919840")
		}
	}
}
mongos> for(var i=1;i<=10000;i++)db.name_test2.insert({age:i,name:"zhangsan",addr:"Chengdu",country:"China"})
WriteResult({ "nInserted" : 1 })
查看分片状态
mongos> sh.status()
--- Sharding Status ---
  sharding version: {
  	"_id" : 1,
  	"minCompatibleVersion" : 5,
  	"currentVersion" : 6,
  	"clusterId" : ObjectId("62d69cd7704c3430bf63cbf7")
  }
  shards:
        {  "_id" : "shard1",  "host" : "shard1/192.168.31.101:27018,192.168.31.101:27019",  "state" : 1 }
        {  "_id" : "shard2",  "host" : "shard2/192.168.31.102:27018,192.168.31.102:27019",  "state" : 1 }
        {  "_id" : "shard3",  "host" : "shard3/192.168.31.103:27018,192.168.31.103:27019",  "state" : 1 }
  active mongoses:
        "4.0.28" : 3
  autosplit:
        Currently enabled: yes
  balancer:
        Currently enabled:  yes
        Currently running:  no
        Failed balancer rounds in last 5 attempts:  0
        Migration Results for the last 24 hours:
                682 : Success
  databases:
        {  "_id" : "config",  "primary" : "config",  "partitioned" : true }
                config.system.sessions
                        shard key: { "_id" : 1 }
                        unique: false
                        balancing: true
                        chunks:
                                shard1	342
                                shard2	341
                                shard3	341
                        too many chunks to print, use verbose if you want to force print
        {  "_id" : "kgc",  "primary" : "shard2",  "partitioned" : true,  "version" : {  "uuid" : UUID("2653055b-65ac-4543-8c00-f48e5c8042e5"),  "lastMod" : 1 } }
        {  "_id" : "shard_test",  "primary" : "shard2",  "partitioned" : true,  "version" : {  "uuid" : UUID("165bbb52-485e-4075-af8f-075c85c62689"),  "lastMod" : 1 } }
        {  "_id" : "shard_test2",  "primary" : "shard1",  "partitioned" : true,  "version" : {  "uuid" : UUID("38355519-6f60-4c3f-aeff-2fde2835ed67"),  "lastMod" : 1 } }
发现shard_test和shard_test2库数据存储在不同shard上,说明成功!!!