JumpServer堡垒机教程
一、认识JumpServer
JumpServer是什么?
JumpServer是一个开源的堡垒机(Bastion Host) 产品。它的主要作用是作为统一的运维审计和访问控制平台,用来管理和控制对服务器、数据库、网络设备等IT资源的访问。
JumpServer是由Python的Django框架写的一个平台。
JumpServer的功能特点
🔹 1. 身份认证与访问控制
- 统一认证:支持本地用户、LDAP、AD、OAuth2、SAML 等多种方式。
- 精细化授权:基于用户、用户组、资产、资产组的 RBAC 权限模型,控制谁能访问哪些资源、具备哪些操作权限。
- 多因子认证:支持 MFA(Google Authenticator、短信、邮件等),提升登录安全。
🔹 2. 多协议与多资产支持
- 系统登录:支持 SSH、Telnet、RDP、VNC 等。
- 数据库登录:支持 MySQL、PostgreSQL、Oracle、SQL Server 等。
- Kubernetes 支持:可以通过 JumpServer 访问和管理 K8s 集群资源。
- Web 访问:用户可以直接在浏览器中访问服务器和数据库,无需安装本地客户端。
🔹 3. 操作审计与安全合规
- 命令审计:所有操作的命令、输出都会被记录。
- 会话录像:支持录像和回放 SSH、RDP 等操作全过程。
- 文件传输审计:记录上传/下载操作,可设置黑白名单规则。
- 操作告警:对敏感操作进行实时告警。
🔹 4. 运维效率与用户体验
- Web 终端:直接通过浏览器进行 SSH、RDP 登录。
- 资产自动发现:支持通过 API、Ansible、CMDB 自动同步和发现主机。
- 批量命令执行:支持在多台主机上批量下发命令。
- 文件分发:支持跨主机的文件分发和管理。
🔹 5. 系统架构与可扩展性
- 组件化设计:核心组件(Core、Lina、KoKo、Magnus 等)可独立扩展。
- 高可用部署:支持多节点部署、负载均衡。
- 开放 API:提供 RESTful API,可与 CMDB、监控、CI/CD 流程集成。
JumpServer可管理的资产类型
- SSH (Linux / Unix / 网络设备 等)
- Windows (Web 方式连接 / 原生 RDP 连接)
- 数据库 (MySQL / MariaDB / Oracle / SQLServer / PostgreSQL / ClickHouse 等)
- NoSQL (Redis / MongoDB 等)
- GPT (ChatGPT 等)
- 云服务 (Kubernetes / VMware vSphere 等)
- Web 站点 (各类系统的 Web 管理后台)
- 应用 (通过 Remote App 连接各类应用)
二、部署JumpServer
★准备工作★
JumpServer官网:https://www.jumpserver.org/
JumpServer官网文档:https://docs.jumpserver.org/zh/v4/
GitHub地址:https://github.com/jumpserver/jumpserver
环境要求
| 操作系统 | 系统架构 | Linux内核版本 | CPU | 内存 | 硬盘 |
|---|---|---|---|---|---|
| Linux主流系统 | x86_64 | >= 4.0 | 2核 | 8G | 60G |
| Linux主流系统 | aarch64 | >= 4.0 | 2核 | 8G | 60G |
安装基础软件
Debian / Ubuntu
apt -y install wget curl tar gettext iptables python
RedHat / CentOS
yum -y install wget curl tar gettext iptables python
数据库准备
JumpServer需要使用PostgreSQL、MySQL或MariaDB存储数据,使用Redis缓存数据。
数据具体要求如下:
| 名称 | 版本 | 默认字符集 | 默认字符编码 |
|---|---|---|---|
| PostgreSQL | >= 9.6 | UTF8 | en_US.utf8 |
| MySQL | >= 5.7 | utf8 | utf8_general_ci |
| MariaDB | >= 10.6 | utf8mb3 | utf8mb3_general_ci |
注意:Redis数据库版本
>=6.0即可,需要单节点,目前不支持群集。
数据库创建库和用户以及密码。
PostgreSQL数据库
create database jumpserver with encoding='UTF8';
MySQL数据库
create database jumpserver default charset 'utf8';
在线安装部署
1.下载软件包
# 国内地址
wget https://resource.fit2cloud.com/jumpserver/installer/releases/download/v4.10.8/jumpserver-installer-v4.10.8.tar.gz
# GitHub地址
cd /opt wget https://github.com/jumpserver/installer/releases/download/v4.10.8/jumpserver-installer-v4.10.8.tar.gz
2.解压到jumpserver的工作目录下
tar -xf jumpserver-installer-v4.10.8.tar.gz
mv jumpserver-installer-v4.10.8 /usr/local/jumpserver
cd /usr/local/jumpserver
3.修改配置文件模板config-example.txt
模板文件原内容:
# JumpServer configuration file example.
#
# If you don't understand the purpose, you can skip modifying this configuration file, the system will automatically fill in
# Complete parameter documentation https://docs.jumpserver.org/zh/v3/guide/env/

################################# Image Configuration #################################
#
# The connection to docker.io in China will timeout or the download speed will be slow, enable this option to use Huawei Cloud image acceleration
# Replace the old version DOCKER_IMAGE_PREFIX
#
# DOCKER_IMAGE_MIRROR=1

# Image pull policy Always, IfNotPresent
# Always means that the latest image will be pulled every time, IfNotPresent means that the image will be pulled only if it does not exist locally
#
# IMAGE_PULL_POLICY=Always

############################## Installation Configuration #############################
#
# JumpServer database persistence directory, by default, recordings, task logs are in this directory
# Please modify according to the actual situation, the database file (.sql) and configuration file backed up during the upgrade will also be saved to this directory
#
VOLUME_DIR=/data/jumpserver

# Encryption key, please ensure that SECRET_KEY is consistent with the old environment when migrating, do not use special strings
# (*) Warning: Keep this value secret.
# (*) Do not disclose SECRET_KEY to anyone
#
SECRET_KEY=

# The token used by the component to register with core, please keep BOOTSTRAP_TOKEN consistent with the old environment when migrating,
# Do not use special strings
# (*) Warning: Keep this value secret.
# (*) Do not disclose BOOTSTRAP_TOKEN to anyone
#
BOOTSTRAP_TOKEN=

# Log level INFO, WARN, ERROR
#
LOG_LEVEL=ERROR

# The network segment used by the JumpServer container, please do not conflict with the existing network, modify according to the actual situation
#
DOCKER_SUBNET=192.168.250.0/24

# ipv6 nat, no need to enable under normal circumstances
# If the host does not support ipv6, enabling this option will prevent the real client ip address from being obtained
#
USE_IPV6=0
DOCKER_SUBNET_IPV6=fc00:1010:1111:200::/64

################################# DB Configuration ####################################
# For external databases, you need to enter the correct database information, the system will automatically handle the built-in database
# (*) The password part must not contain single quotes and double quotes
#
DB_ENGINE=postgresql
DB_HOST=postgresql
DB_PORT=5432
DB_USER=postgres
DB_PASSWORD=
DB_NAME=jumpserver

# If external MySQL needs to enable TLS/SSL connection, refer to https://docs.jumpserver.org/zh/v3/installation/security_setup/mysql_ssl/
#
# DB_USE_SSL=true

################################# Redis Configuration #################################
# For external Redis, please enter the correct Redis information, the system will automatically handle the built-in Redis
# (*) The password part must not contain single quotes and double quotes
#
REDIS_HOST=redis
REDIS_PORT=6379
REDIS_PASSWORD=

# If you are using external Redis Sentinel, please manually fill in the following content
#
# REDIS_SENTINEL_HOSTS=mymaster/192.168.100.1:26379,192.168.100.1:26380,192.168.100.1:26381
# REDIS_SENTINEL_PASSWORD=your_sentinel_password
# REDIS_PASSWORD=your_redis_password
# REDIS_SENTINEL_SOCKET_TIMEOUT=5

# If external Redis needs to enable TLS/SSL connection, refer to https://docs.jumpserver.org/zh/v3/installation/security_setup/redis_ssl/
#
# REDIS_USE_SSL=true

################################# Access Configuration ################################
# The service port provided to the outside, if it conflicts with the existing service, please modify it yourself
#
HTTP_PORT=80

################################# HTTPS Configuration #################################
# Refer to https://docs.jumpserver.org/zh/v3/installation/proxy/ for configuration
#
# HTTPS_PORT=443
# SERVER_NAME=your_domain_name
# SSL_CERTIFICATE=your_cert
# SSL_CERTIFICATE_KEY=your_cert_key
#

# Nginx file upload and download size limit
#
CLIENT_MAX_BODY_SIZE=4096m

################################# Component Configuration #############################
# Component registration use, by default, register to the core container, the cluster environment needs to be modified to the cluster vip address
#
CORE_HOST=http://core:8080
PERIOD_TASK_ENABLED=true

# Core Session definition,
# SESSION_COOKIE_AGE indicates how many seconds the session expires after idling,
# SESSION_EXPIRE_AT_BROWSER_CLOSE=true means that the session expires as soon as the browser is closed
#
# SESSION_COOKIE_AGE=86400
SESSION_EXPIRE_AT_BROWSER_CLOSE=false

# Trusted DOMAINS definition,
# Define the trusted access IP, please modify according to the actual situation, if it is a public IP, please change to the corresponding public IP,
# DOMAINS="demo.example.com:443"
# DOMAINS="172.17.200.191:80"
# DOMAINS="demo.example.com:443,172.17.200.191:80"
DOMAINS=

# Configure the components that do not need to be started, by default all components will be started, if you do not need a certain component, you can set {component name}_ENABLED to 0 to turn it off
# CORE_ENABLED=0
# CELERY_ENABLED=0
# KOKO_ENABLED=0
# LION_ENABLED=0
# CHEN_ENABLED=0
# WEB_ENABLED=0

# Lion enables font smoothing to optimize the experience
#
JUMPSERVER_ENABLE_FONT_SMOOTHING=true

################################# XPack Configuration #################################
# XPack package, invalid setting in open source version
#
SSH_PORT=2222
RDP_PORT=3389
XRDP_PORT=3390
MAGNUS_MYSQL_PORT=33061
MAGNUS_MARIADB_PORT=33062
MAGNUS_REDIS_PORT=63790
MAGNUS_POSTGRESQL_PORT=54320
MAGNUS_SQLSERVER_PORT=14330
MAGNUS_ORACLE_PORT=15210

XRDP_ENABLED=0

################################## Other Configuration ################################
# The terminal uses the host HOSTNAME as the identifier, automatically generated during the first installation
#
SERVER_HOSTNAME=${HOSTNAME}

# Use built-in SLB, if the client IP address obtained by the Web page is not correct, please set USE_LB to 0
# When USE_LB is set to 1, use the configuration proxy_set_header X-Forwarded-For $remote_addr
# When USE_LB is set to 0, use the configuration proxy_set_header X-Forwarded-For $proxy_add_x_forwarded_for
USE_LB=1

# The current running version number of JumpServer, automatically generated after installation and upgrade
#
TZ=Asia/Shanghai
TIME_ZONE=Asia/Shanghai
CURRENT_VERSION=
需要修改的内容如下:
VOLUME_DIR=/usr/local/jumpserver/data
# 配置两个密钥,后期会用,随机生成即可
SECRET_KEY=djCVZj2KC3R1rwQfwuZxapjgE97t7pXMbit3Dghn46kXWjJl3i
BOOTSTRAP_TOKEN=Df5FZ2hqDylQrRd9
# 数据库的配置,也可以配置postgresql
DB_ENGINE=mysql
DB_HOST=192.168.101.100
DB_PORT=3306
DB_USER=jumpserver
DB_PASSWORD=dn3IB24ndka2Djhs
DB_NAME=jumpserver
# redis的配置
REDIS_HOST=192.168.101.100
REDIS_PORT=6379
REDIS_PASSWORD=dw2DSisdh2Ns3U90
# 启动后的http端口号
HTTP_PORT=80
#指定可访问的域名或IP地址及端口,可以为多个,也可以配置0.0.0.0
DOMAINS=0.0.0.0

# 配置https请求,如有需求请修改以下配置
# HTTPS_PORT=443
# SERVER_NAME=your_domain_name
# SSL_CERTIFICATE=your_cert_file
# SSL_CERTIFICATE_KEY=your_cert_key_file
补充说明:两个密钥可用以下命令生成。
cat /dev/urandom | tr -dc 'a-zA-Z0-9' | fold -w 50 | head -n 1
cat /dev/urandom | tr -dc 'a-zA-Z0-9' | fold -w 16 | head -n 1
4.使用命令进行安装
cd /usr/local/jumpserver
./jmsctl.sh install
安装步骤如下:
首先会弹出配置文件配置和环境配置,只需要默认点回车即可,如下图所示:
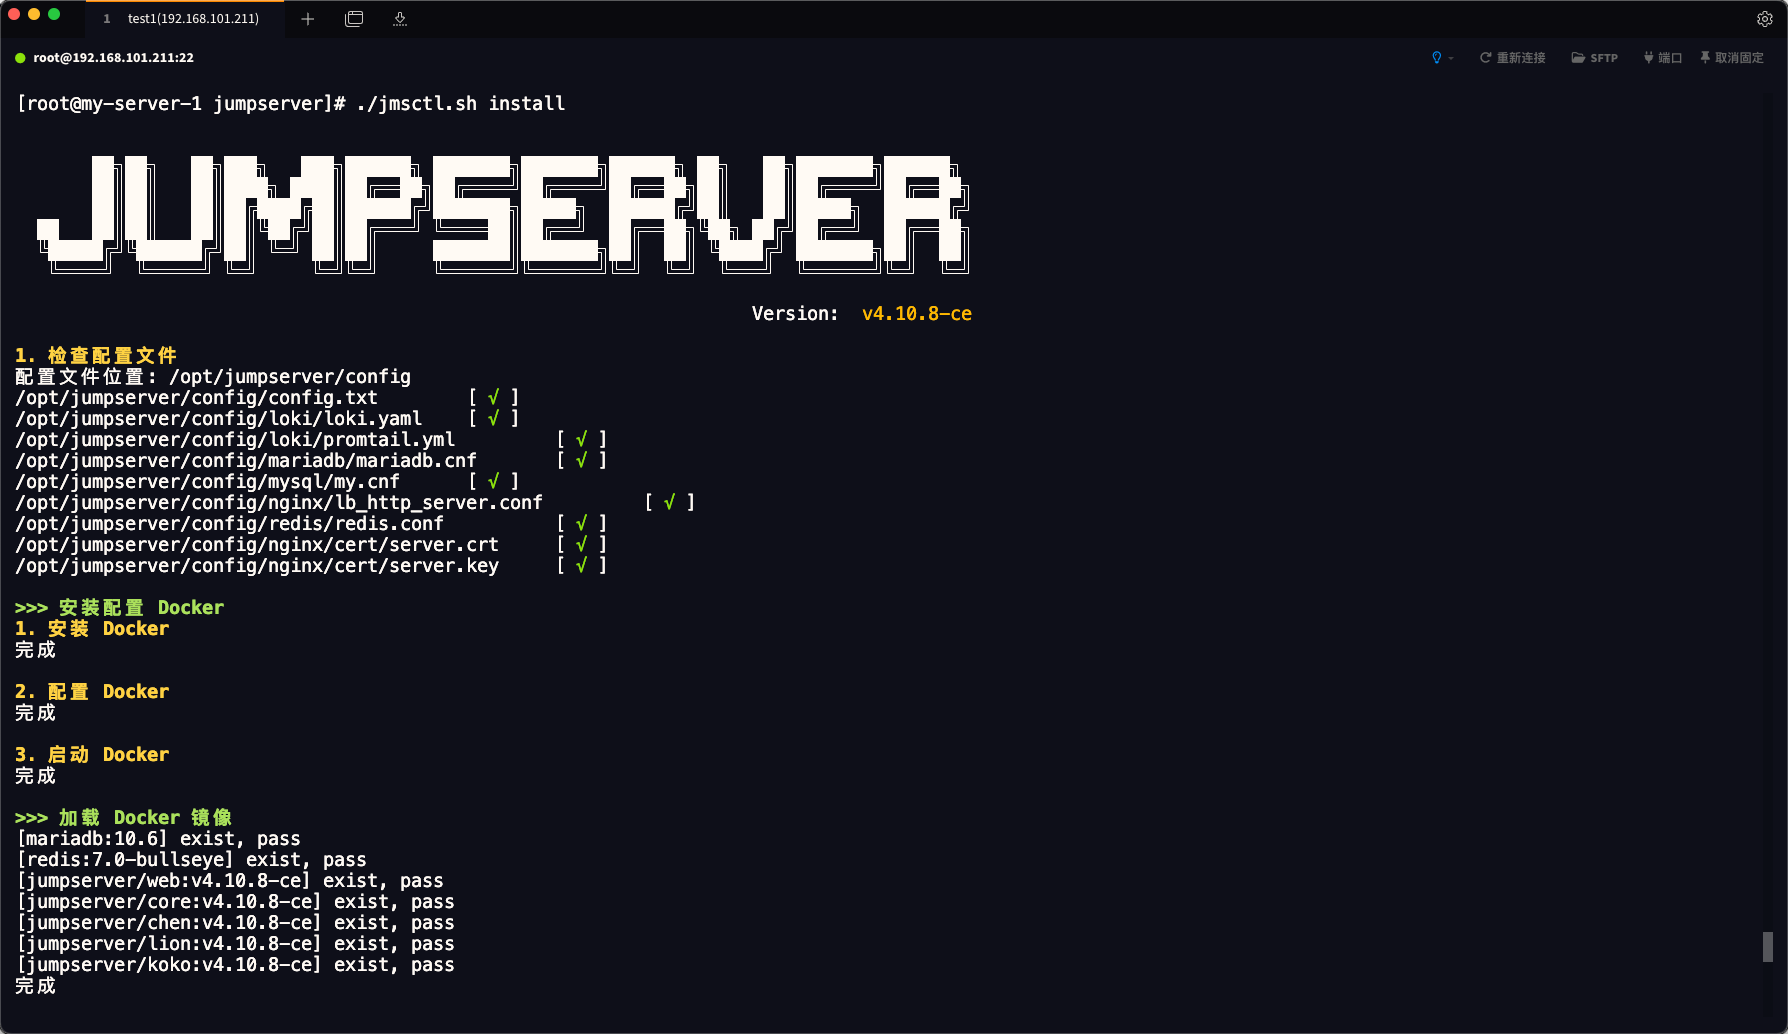
接下来就是配置数据库相关配置,我们在配置文件中已经配置好了,所示一路回车选择默认的配置即可,如下图所示:

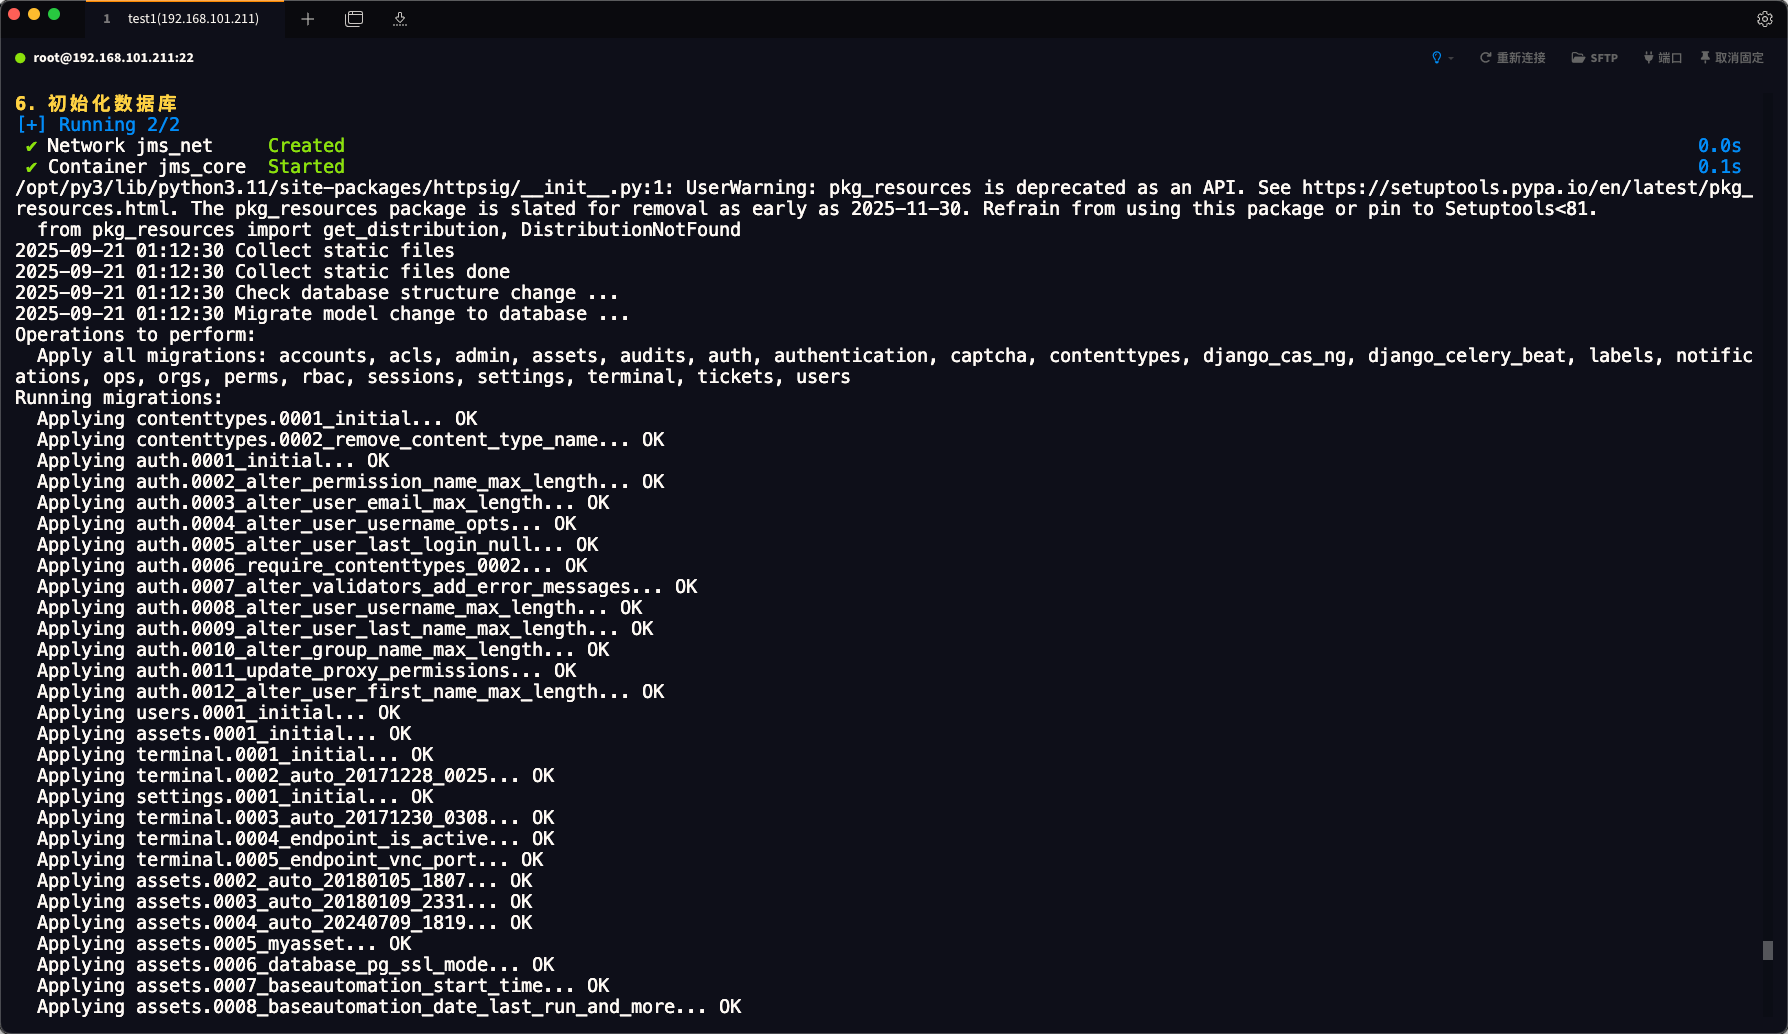
然后系统会自动初始化数据库建表插入所需要的数据,无须我们做其他操作,如下图所示:
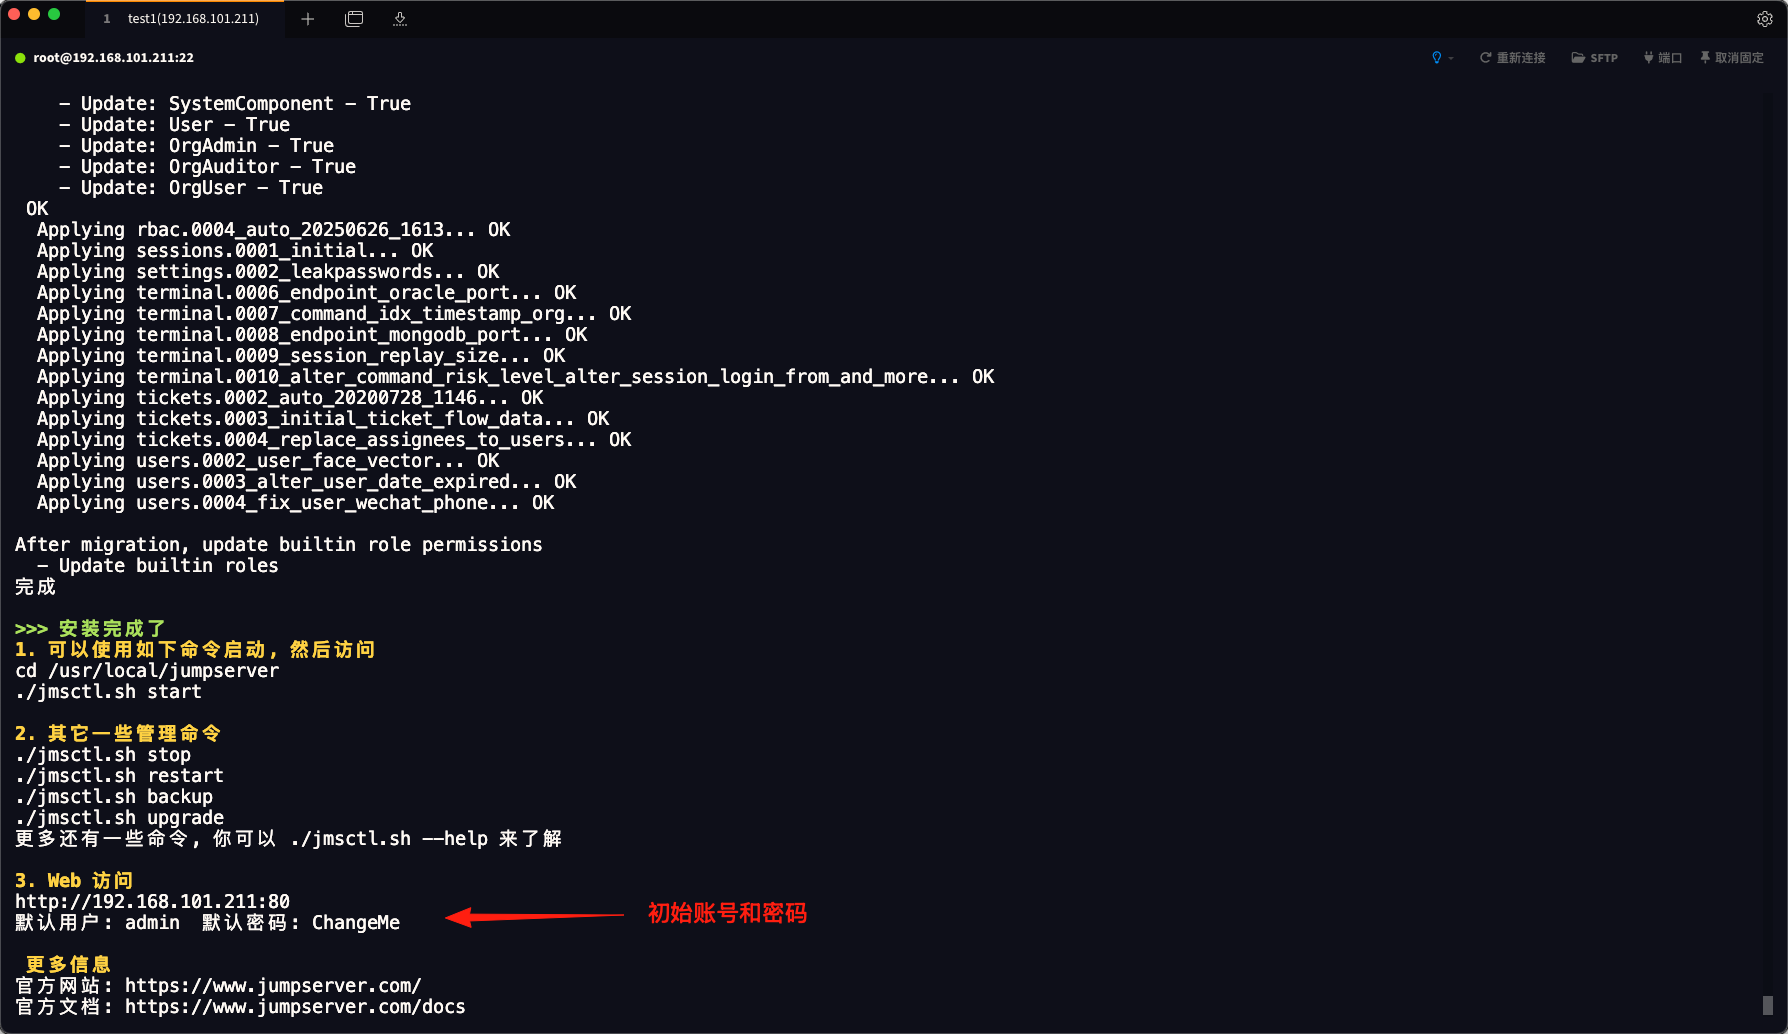
初始化完成之后会显示访问信息的默认的账号以及密码,如下图所示:
5.安装完成之后,直接启动服务
温馨提示:安装的默认路径为
/opt/jumpserver,配置文件会生成到/opt/jumpserver/config/config.txt这个路径下。
启动服务:
./jmsctl.sh start
docker部署
我们也可以通过docker进行部署,jumpserver服务需要依赖MySQL和Redis数据库,然后我们通过镜像jumpserver/jms_all来进行部署,这个镜像里面包含了所有需要的组件。
docker-compose.yaml文件内容如下:
services:
  jumpserver-mysql:
    image: mysql:8.0.40
    container_name: jumpserver-mysql
    restart: unless-stopped
    ports:
      - 3306:3306
    command:
      - --default-authentication-plugin=caching_sha2_password
      - --character-set-server=utf8mb4
      - --collation-server=utf8mb4_general_ci
      - --explicit_defaults_for_timestamp=true
      - --lower_case_table_names=1
      - --max_allowed_packet=128M
    environment:
      - TZ=Asia/Shanghai"
      - MYSQL_ROOT_PASSWORD=WC85roj5IfwOhIEK
      - MYSQL_DATABASE=jumpserver
      - MYSQL_USER=jumpserver
      - MYSQL_PASSWORD=dn3IB24ndka2Djhs
    volumes:
      - ./mysql_data:/var/lib/mysql
    healthcheck:
      test: ["CMD", "mysqladmin", "ping", "-h", "127.0.0.1", "--silent"]
      interval: 5s
      retries: 5
      start_period: 30s

  jumpserver-redis:
    image: redis:6.2.17
    container_name: jumpserver-redis
    restart: always
    command: --requirepass dw2DSisdh2Ns3U90
    ports:
      - 6379:6379
    volumes:
      - ./redis_data:/data
    healthcheck:
      test: "redis-cli -h 127.0.0.1 -a 'dw2DSisdh2Ns3U90' info Replication"
      interval: 10s
      timeout: 5s
      retries: 3
      start_period: 10s

  jumpserver:
    image: jumpserver/jms_all:v4.10.8
    container_name: jumpserver
    privileged: true
    restart: always
    environment:
      - SECRET_KEY=SYmfImNk3TfMCmKmb7h3SYZjfTR6e2jVAjfLZxHAQqIxOdAWLv
      - BOOTSTRAP_TOKEN=9Gd3SM0tR6gmbirptLYdkqXN82ZrQh
      - LOG_LEVEL=INFO
      - DB_ENGINE=mysql
      - DB_HOST=jumpserver-mysql
      - DB_PORT=3306
      - DB_USER=jumpserver
      - DB_PASSWORD=dn3IB24ndka2Djhs
      - DB_NAME=jumpserver
      - REDIS_HOST=jumpserver-redis
      - REDIS_PORT=6379
      - REDIS_PASSWORD=dw2DSisdh2Ns3U90
      - DOMAINS=-
    ports:
      - 80:80
      - 2222:2222
    volumes:
      - ./data/jumpserver:/opt/jumpserver/data
      - ./data/koko:/opt/jumpserver/koko/data
      - ./data/lion:/opt/jumpserver/lion/data
      - ./data/chen:/opt/jumpserver/chen/data
      - ./data/kael:/opt/jumpserver/kael/data
      - ./nginx_logs:/var/log/nginx
    depends_on:
      jumpserver-mysql:
        condition: service_healthy
      jumpserver-redis:
        condition: service_healthy
    healthcheck:
      test: "curl -fsL http://localhost/api/health/ > /dev/null"
      interval: 10s
      timeout: 5s
      retries: 3
      start_period: 90s

networks:
  default:
    name: jumpserver
    driver: bridge
我们编写就可以通过以下命令来启动,如下所示:
docker compose up -d
查看服务运行状态
$ docker compose ps
NAME               IMAGE                        COMMAND                   SERVICE            CREATED              STATUS                        PORTS
jumpserver         jumpserver/jms_all:v4.10.8   "./entrypoint.sh"         jumpserver         About a minute ago   Up About a minute (healthy)   0.0.0.0:80->80/tcp, [::]:80->80/tcp, 0.0.0.0:2222->2222/tcp, [::]:2222->2222/tcp
jumpserver-mysql   mysql:8.0.40                 "docker-entrypoint.s…"   jumpserver-mysql   About a minute ago   Up About a minute (healthy)   0.0.0.0:3306->3306/tcp, [::]:3306->3306/tcp, 33060/tcp
jumpserver-redis   redis:6.2.17                 "docker-entrypoint.s…"   jumpserver-redis   About a minute ago   Up About a minute (healthy)   6379/tcp
访问测试
我们访问默认配置的80端口即可,会出现登录界面,我们使用默认的账号和密码登录即可,如下图所示:
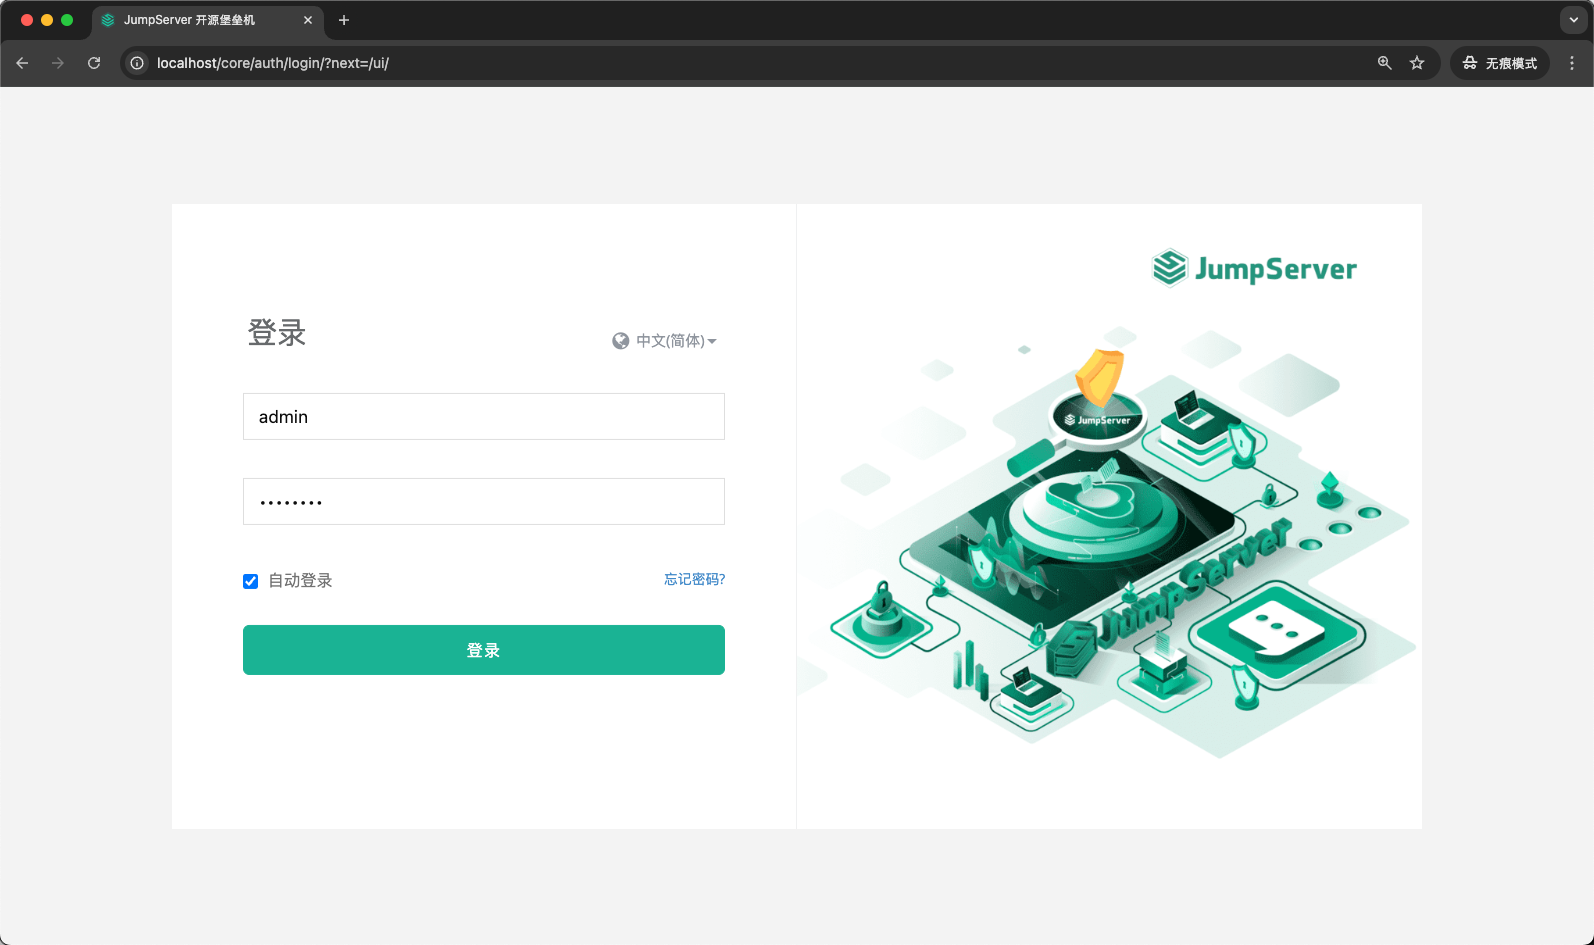
温馨提示:默认的账号为:admin,密码为:ChangeMe
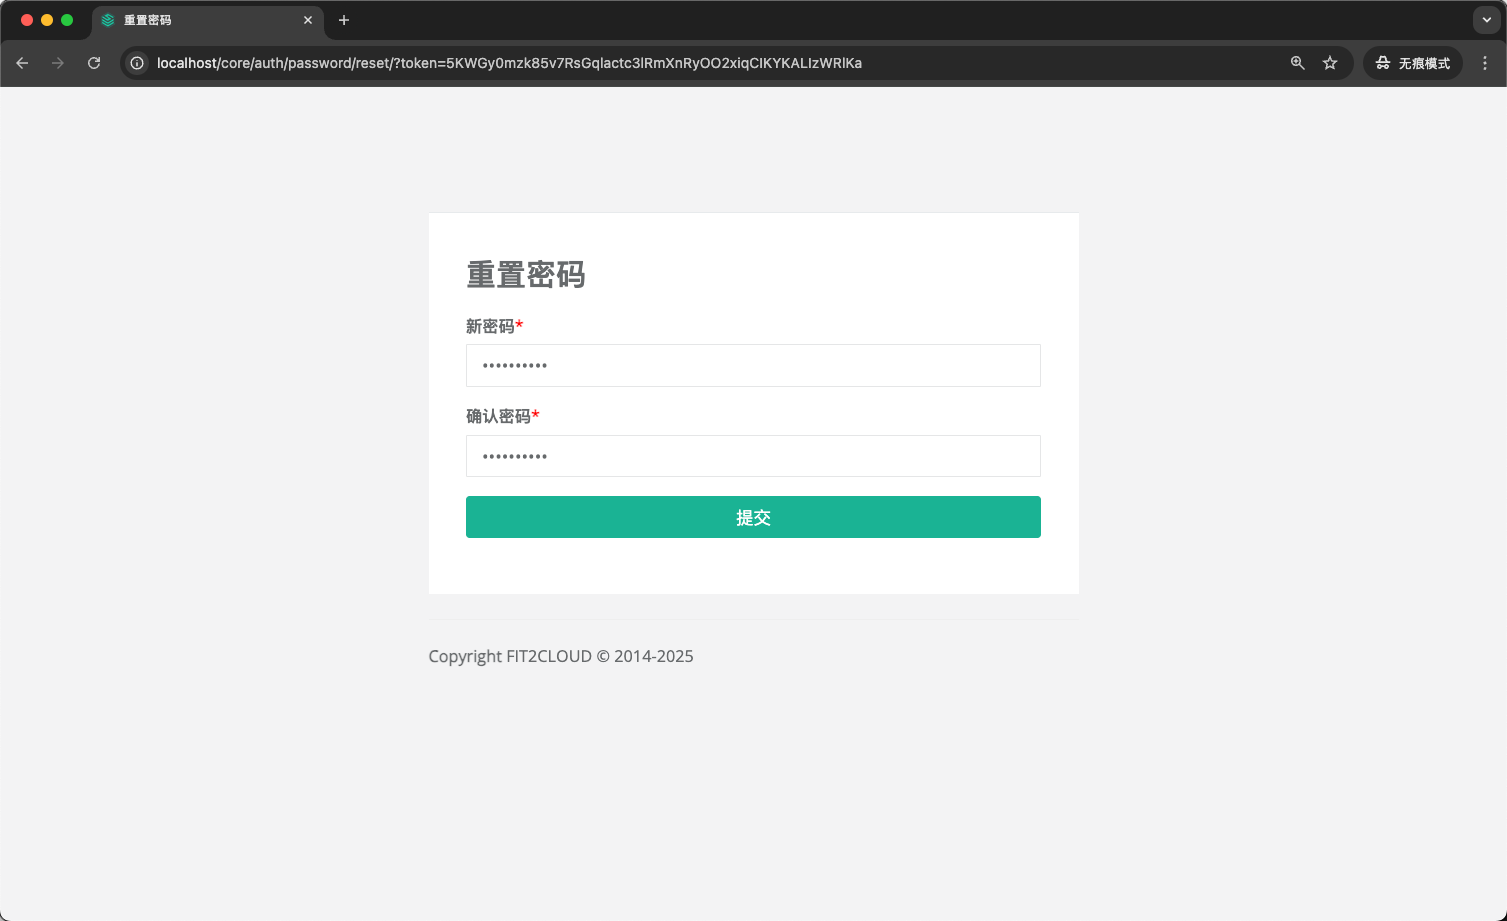
然后第一次会默认让我们重置修改密码,修改完成之后用新的密码进行登录,如下图所示:
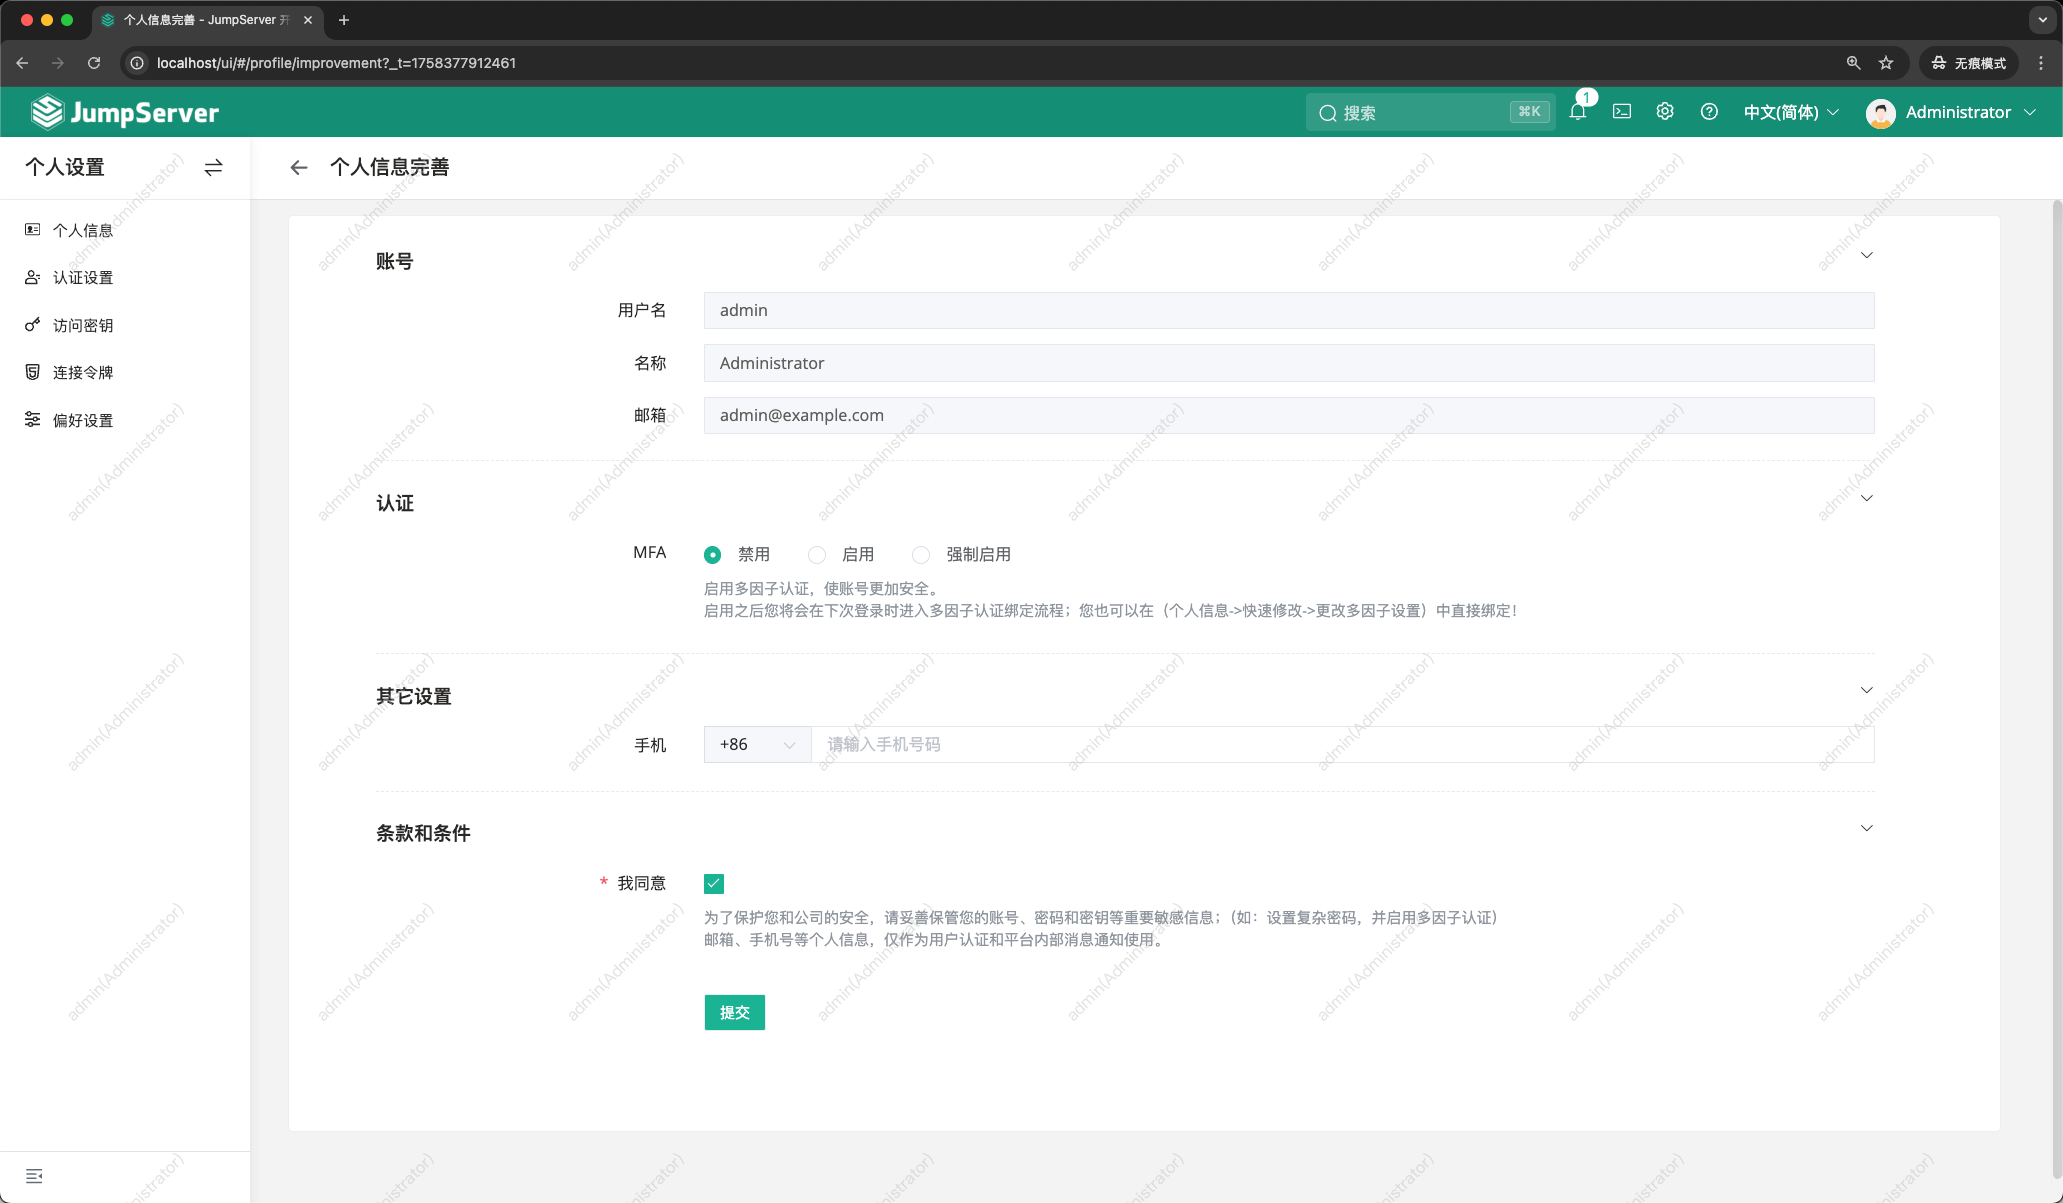
登录进来之后会让我们选择是否启用MFA认证,然后点同意和提交即可,如下图所示:
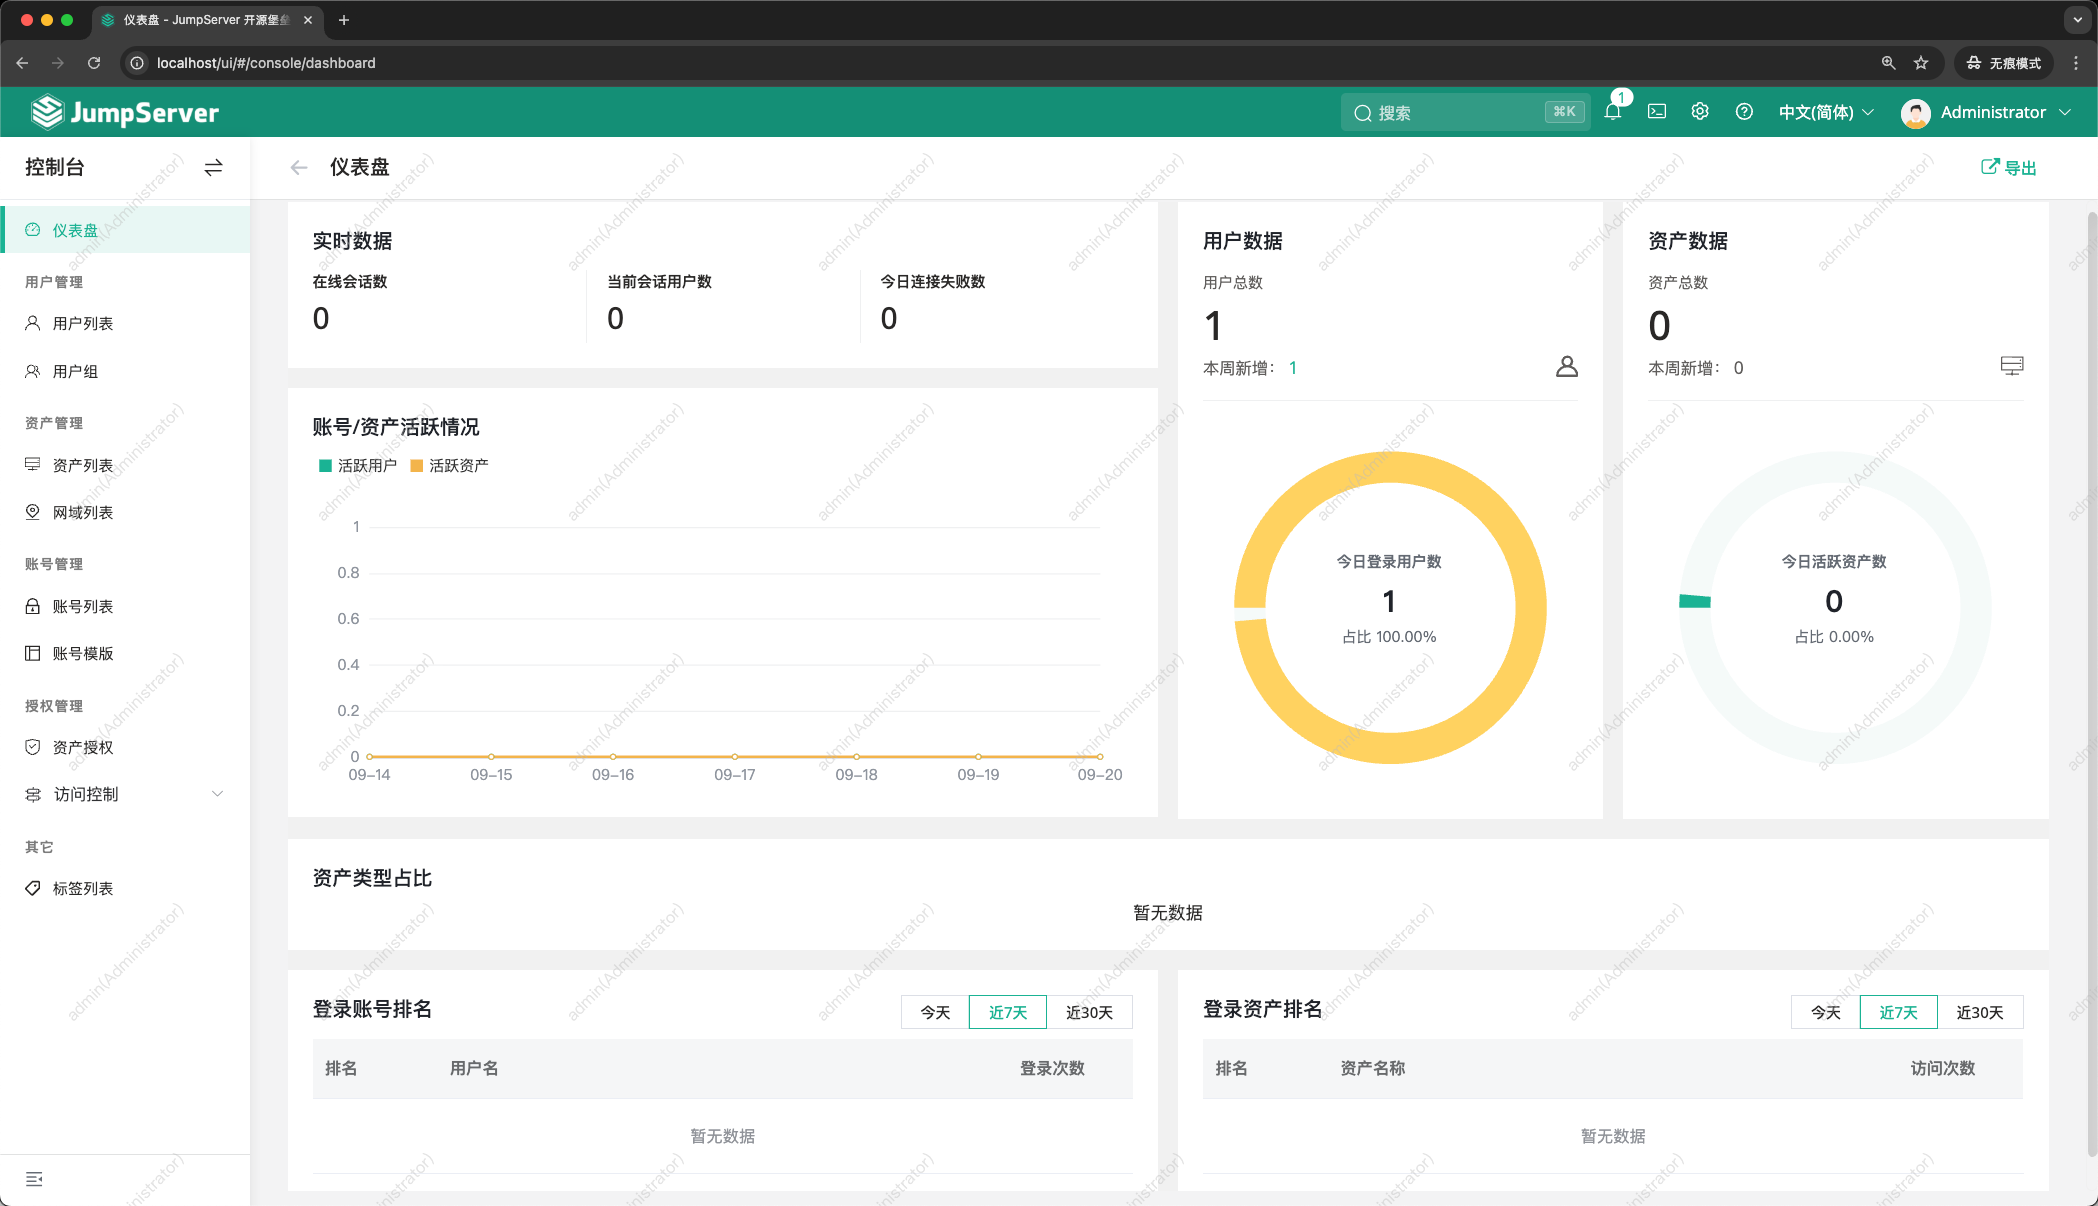
最后,就进入了jumpserver的管理界面,如下图所示:
服务管理
安装完成之后可以通过以下命令进行管理,如下所示:
# 启动服务
./jmsctl.sh start
# 停止服务
./jmsctl.sh down
# 卸载服务
./jmsctl.sh uninstall
三、JumpServer功能使用
资产管理
1.添加资产
通过添加我们的资产来对这些资产进行管理。
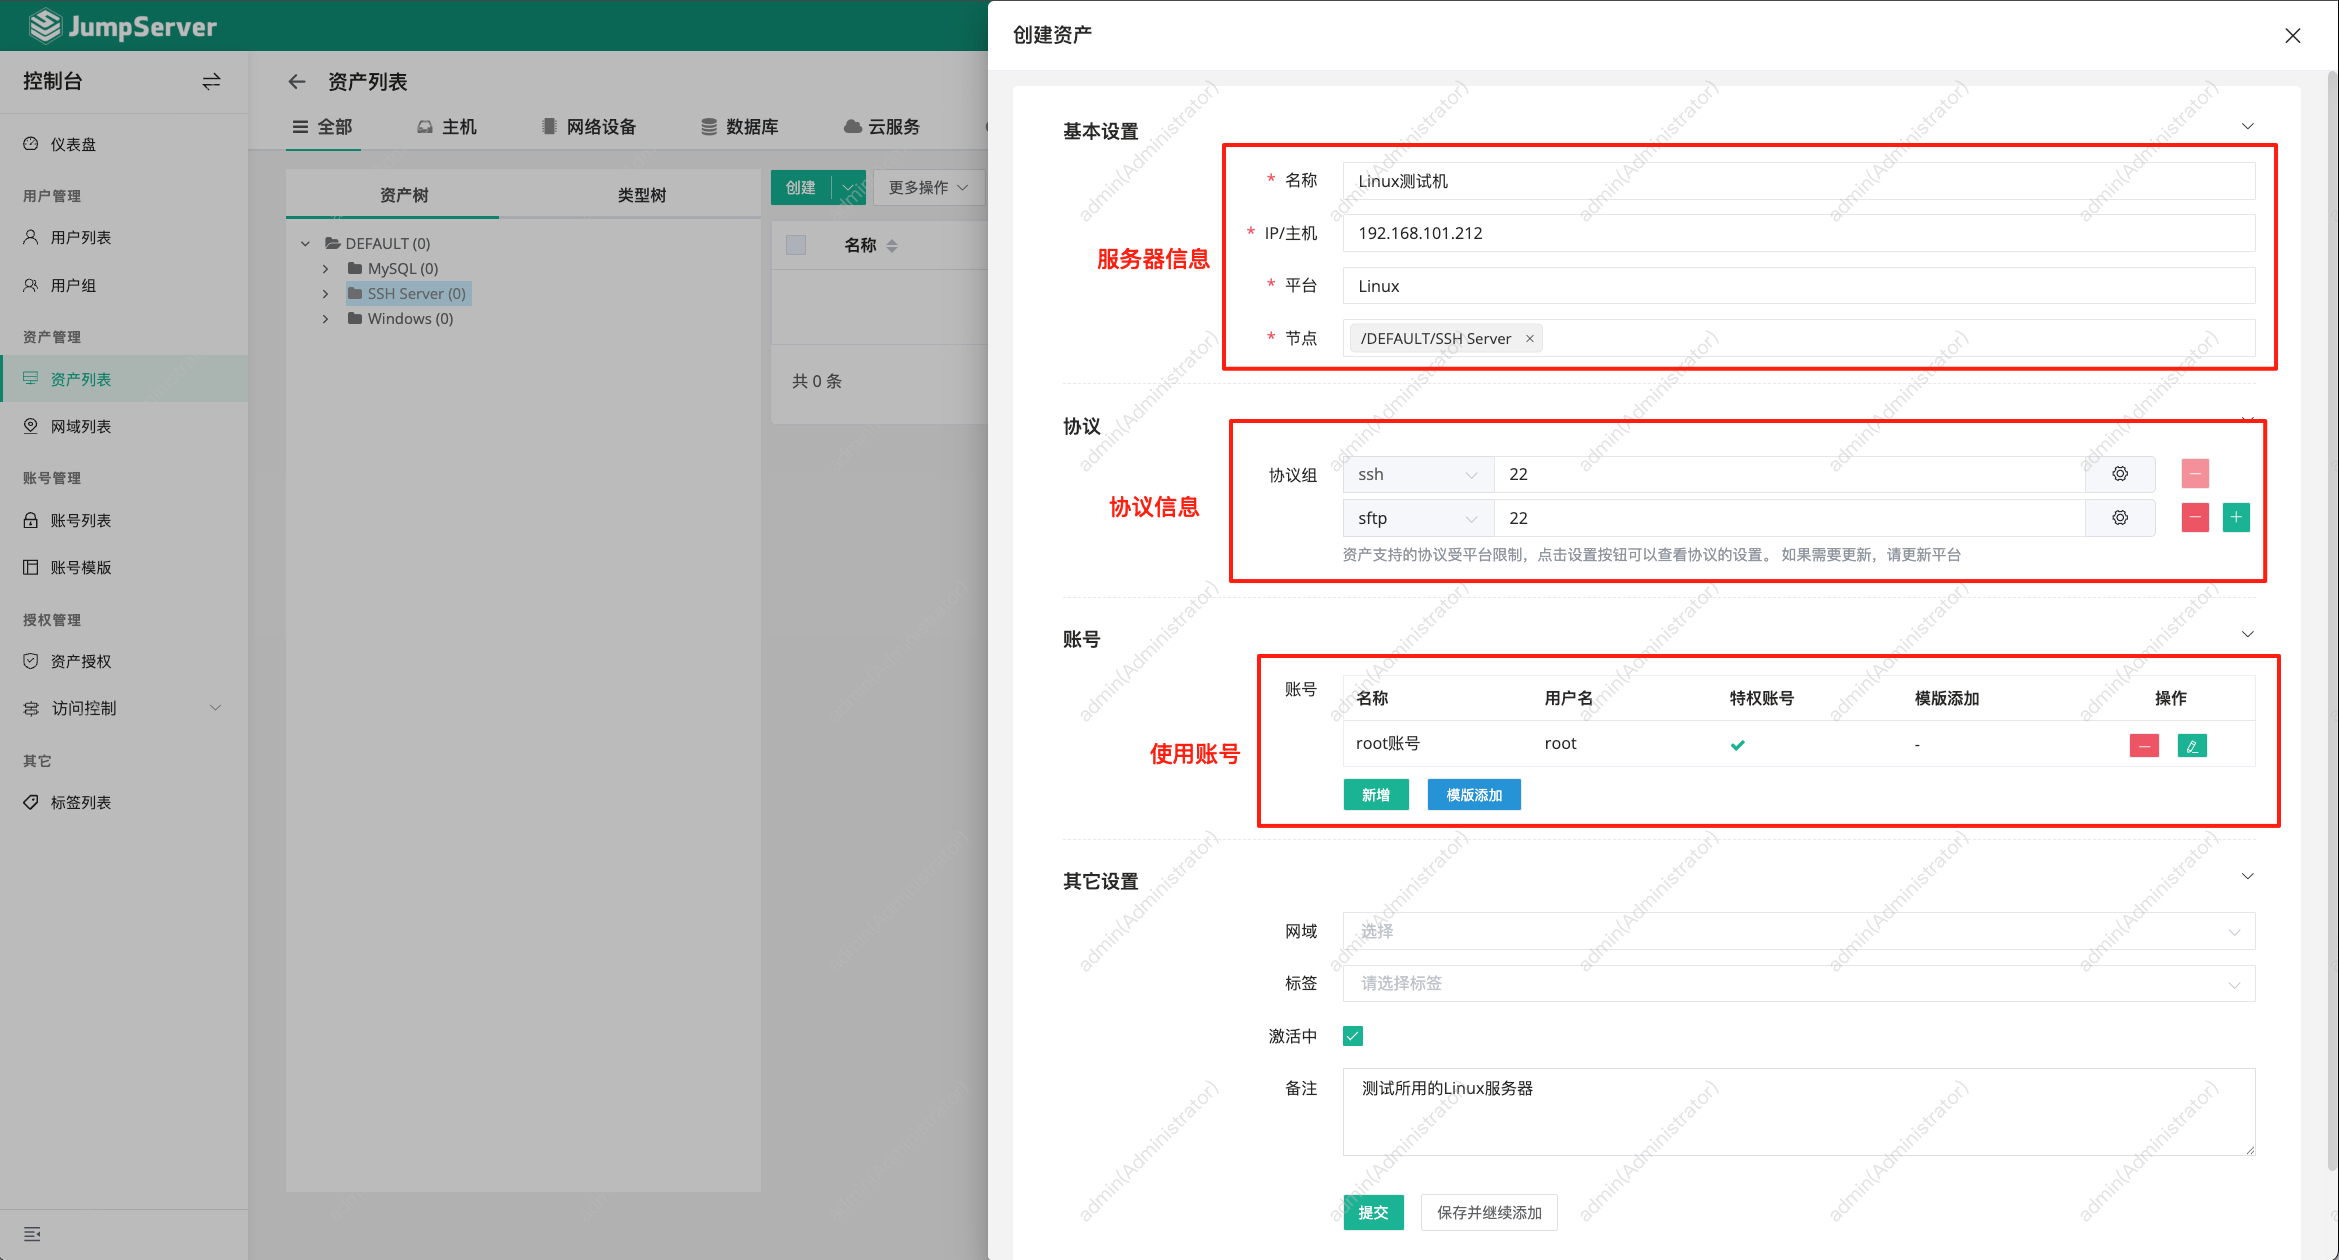
可以在控制台页面上点击资产列表页面中点击创建按钮添加资产,可以根据需要添加资产的类型,如下图所示:

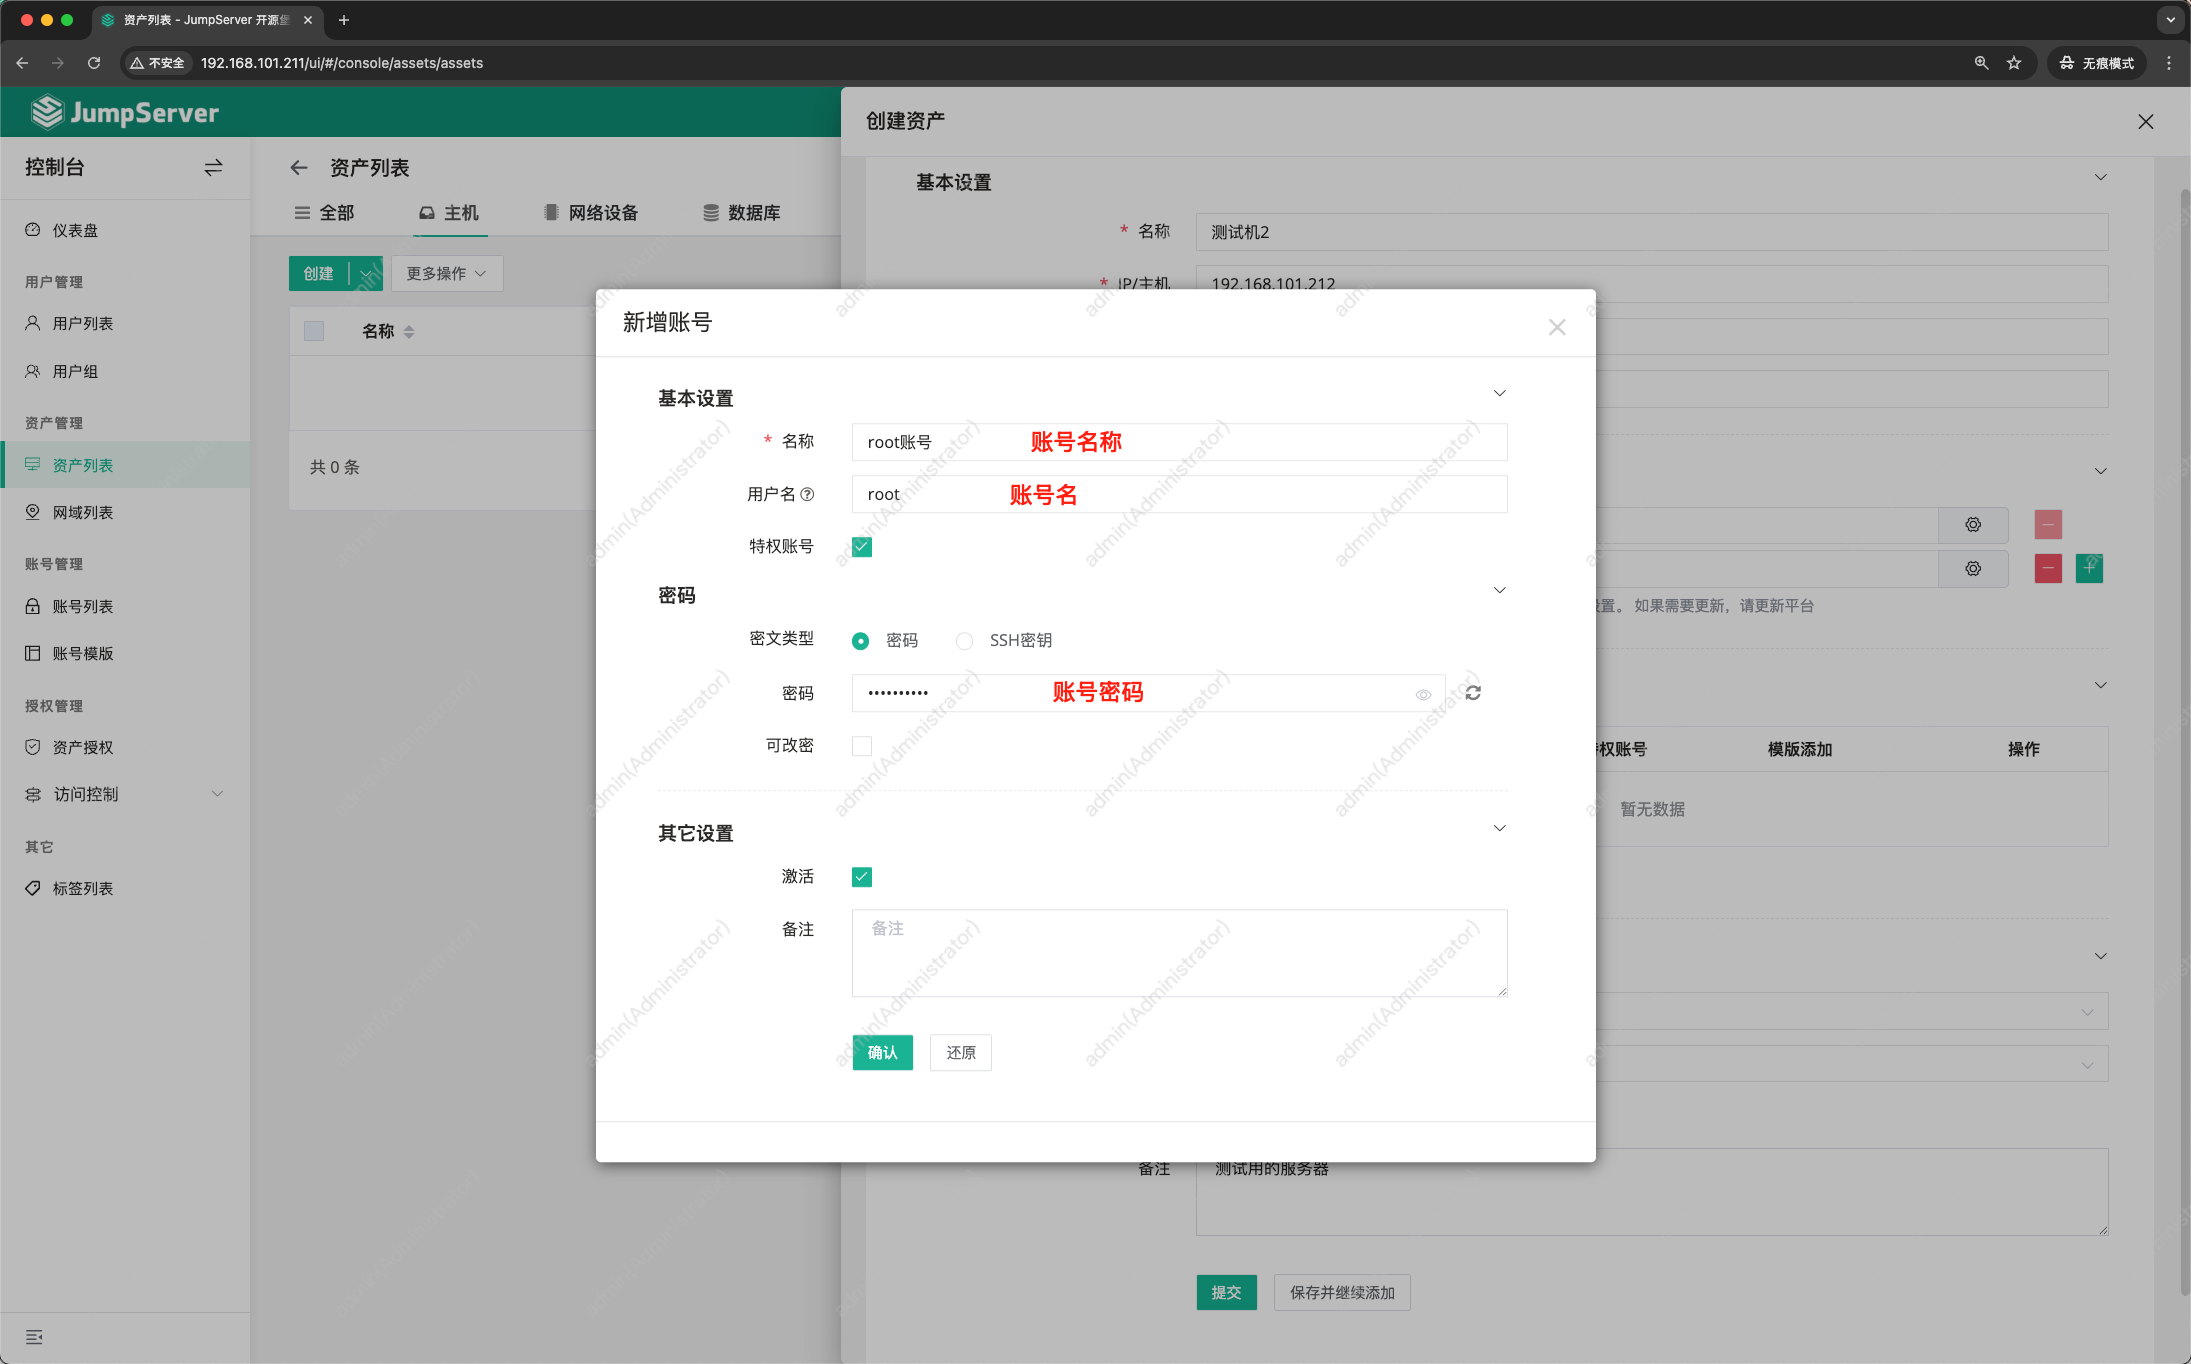
以创建Linux主机为例,在页面中设置资产相关信息,我们配置连接资产所需要的账号和密码,如下图所示:
还需要配置Linux服务器的信息以及连接协议和账号配置,如下所示:
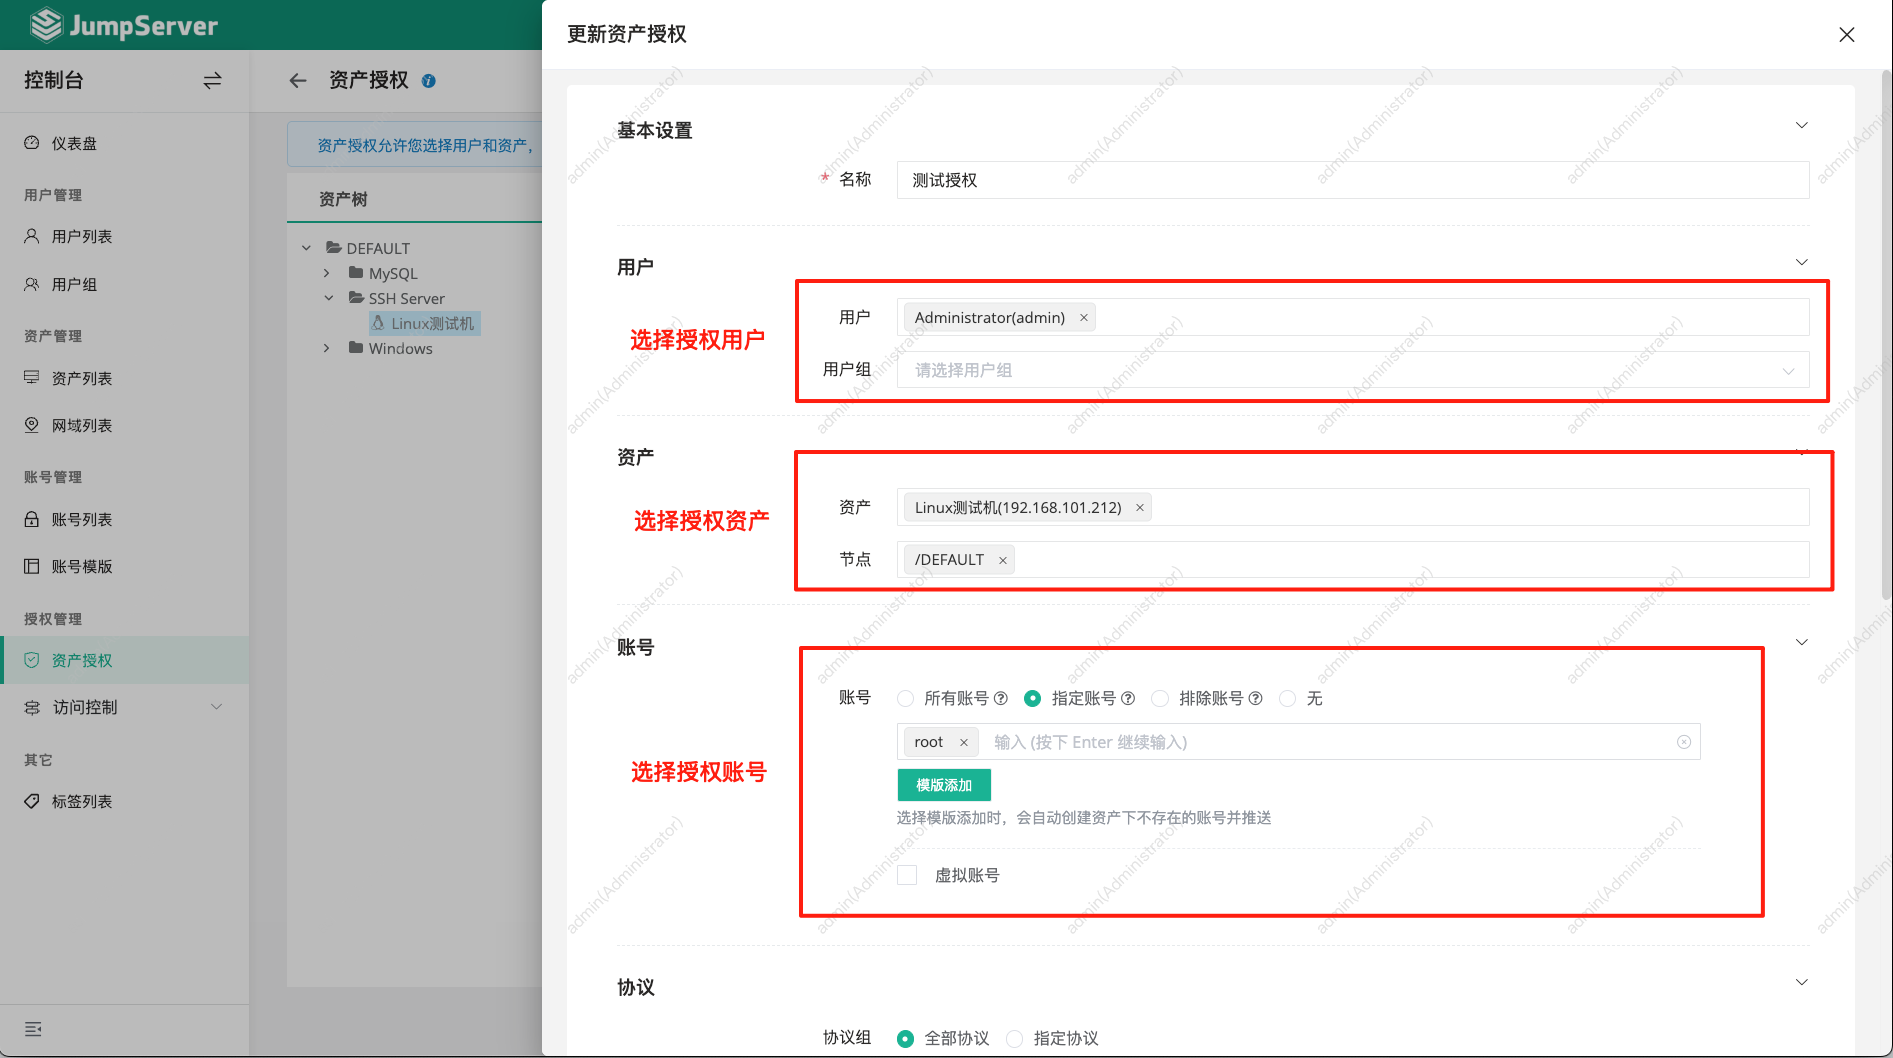
2.资产授权
通过添加资产授权来给用户提供可用的资产。
可以在控制台页面进入资产授权点击创建按钮新增资产授权,我们需要配置平台用户、授权的资产以及能使用的资产账号,如下图所示:
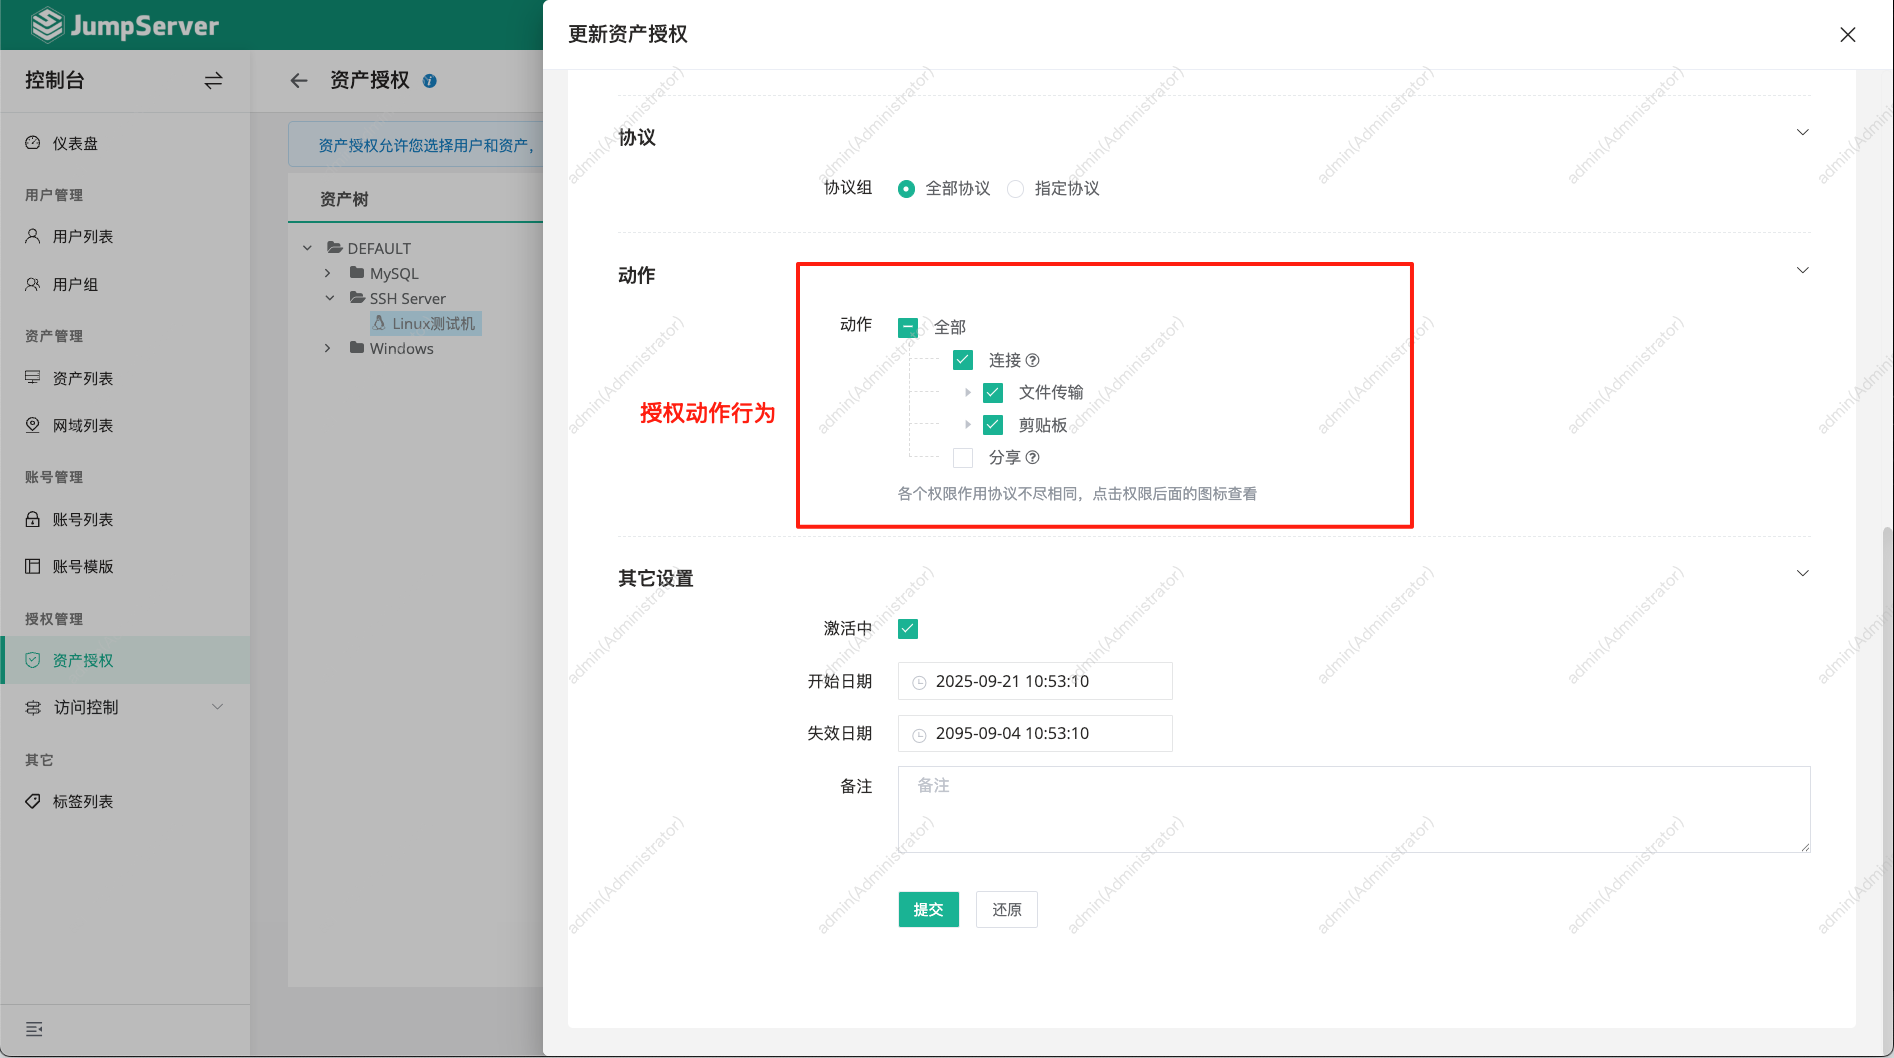
还可以指定能做的动作行为,比如:远程连接、文件传输等,如下所示:
特别注意:以上只为演示,在实际运用中最好创建其他账号,对该账号进行授权,不要用Admin管理员账号,这样行为很不安全。
Web操作界面
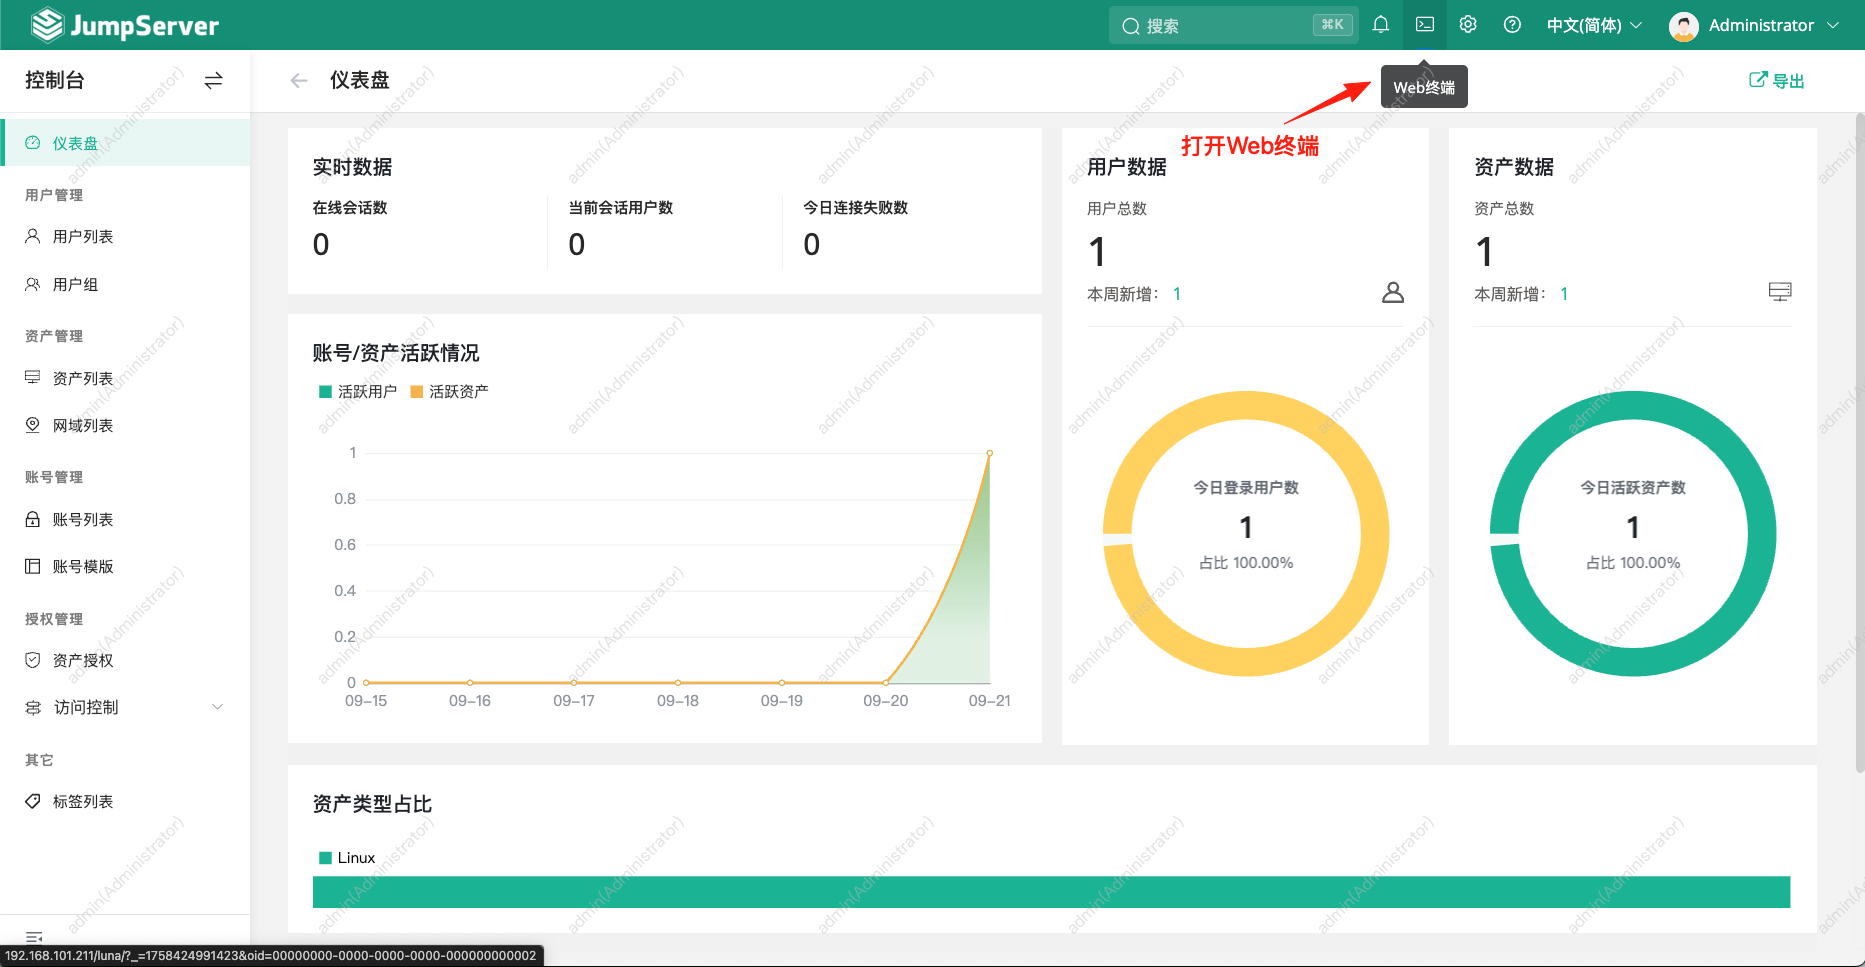
操控资产的方式之一就是:Web操作界面。
可以通过控制台页面点击Web终端进入Web操作界面,如下图所示:
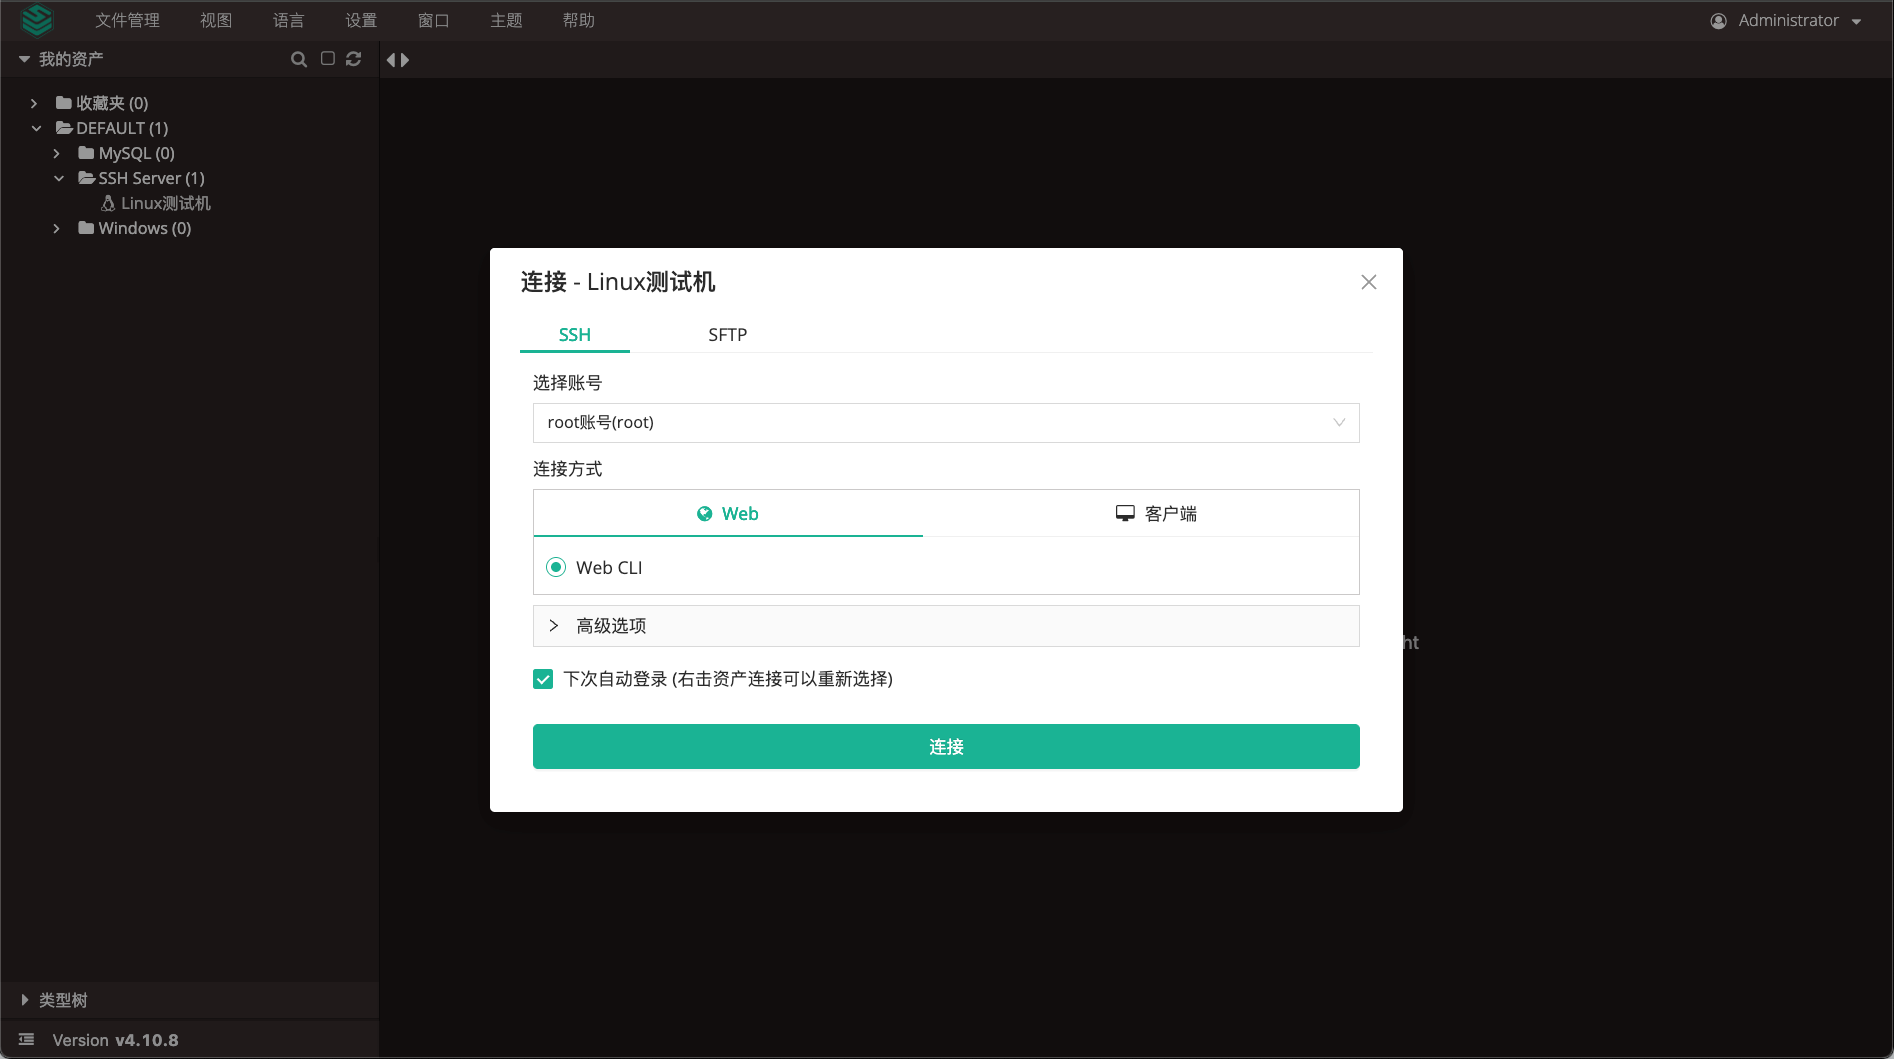
进入Web操作界面之后,可以在左边看到我们已有的资产清单,如下图所示:

选择连接的资产服务器,如下图所示:
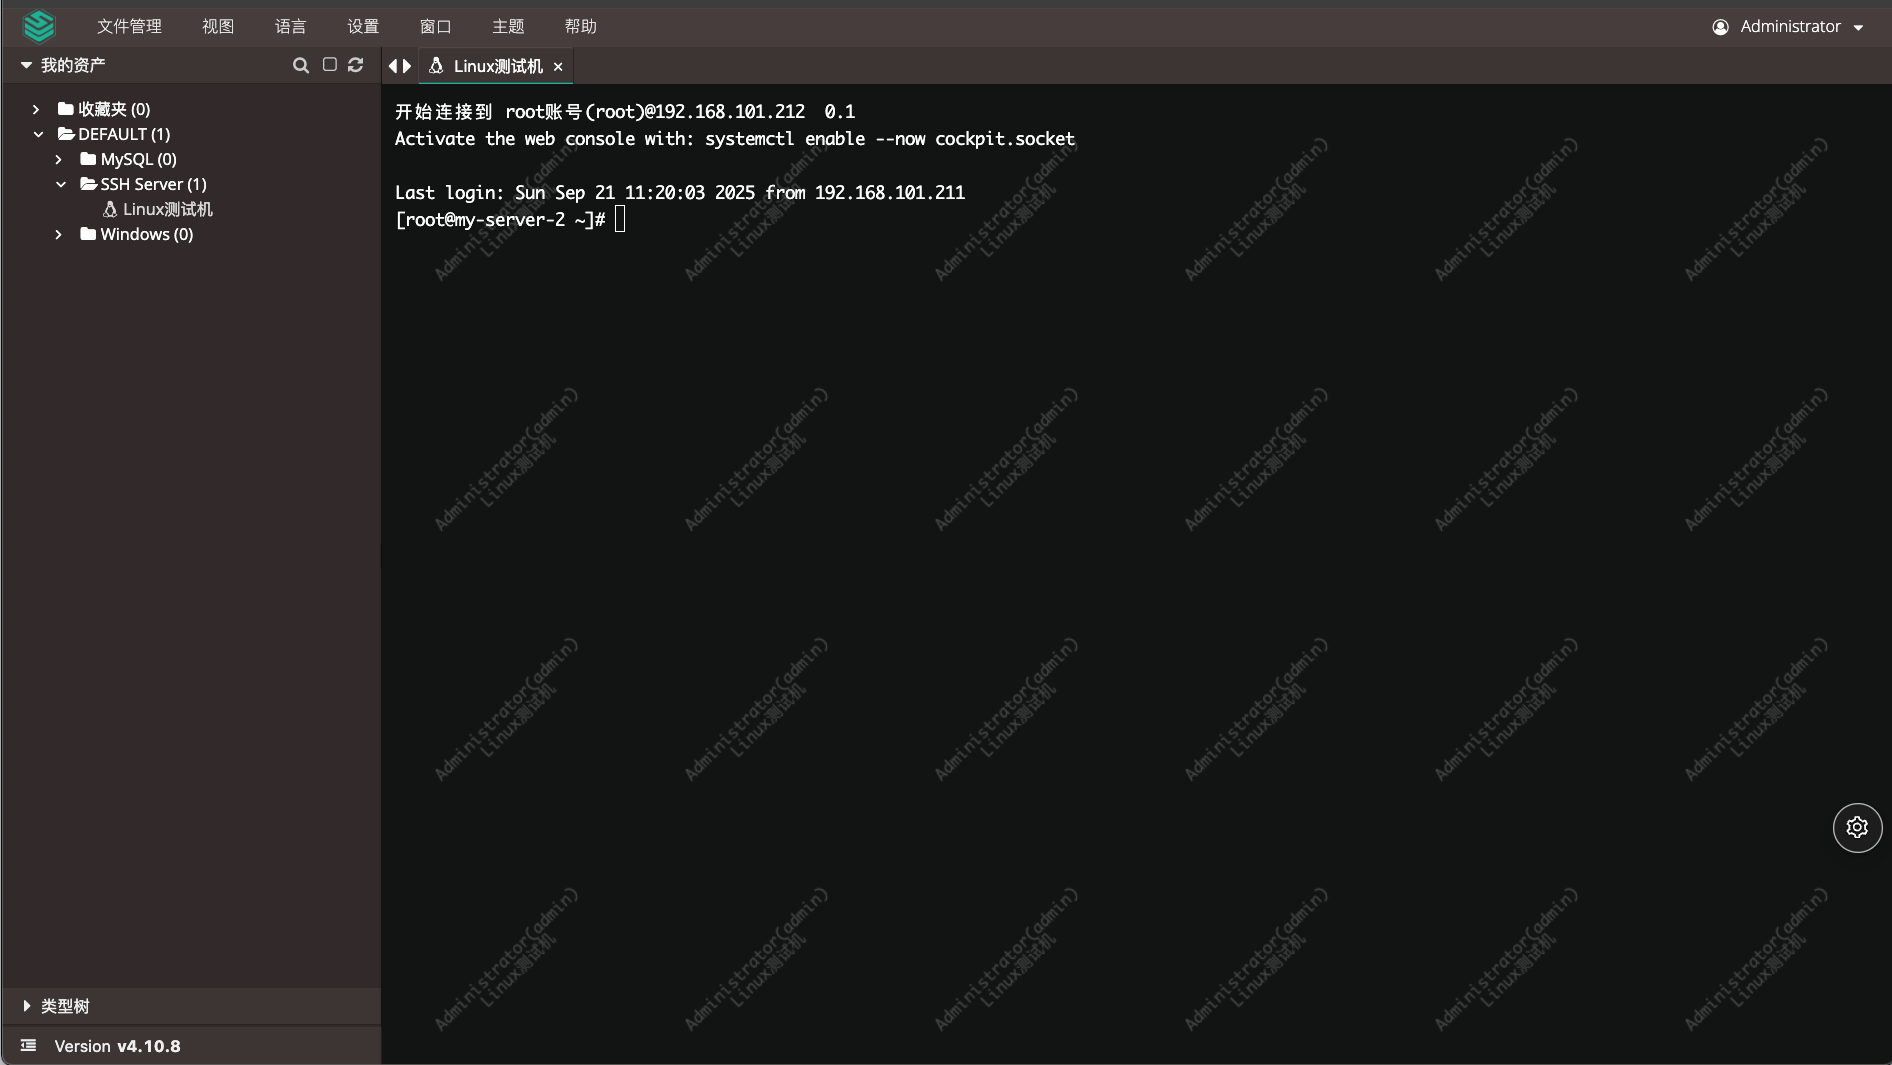
连接成功了之后,我们可以像正常的SSH终端一样操做我们的资产服务器,如下图所示:
远程操作界面
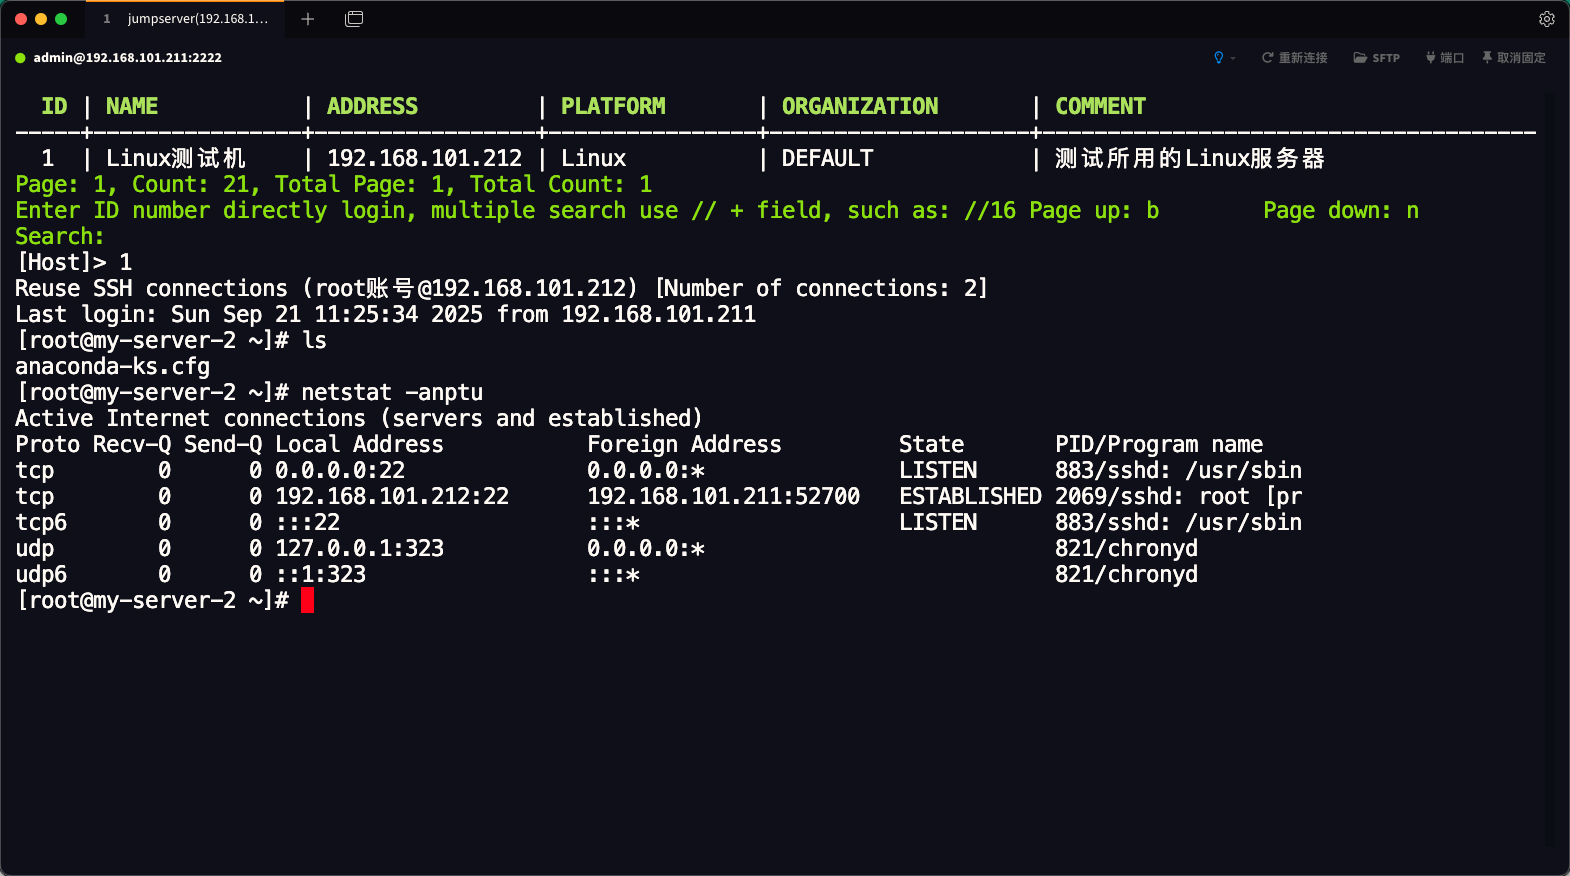
还有的操控资产的方式之一就是:远程代理连接操作。
可以通过连接服务器地址的2222端口对堡垒机进行连接操作,连接成功之后会出现功能选择的操作界面,如下图所示:
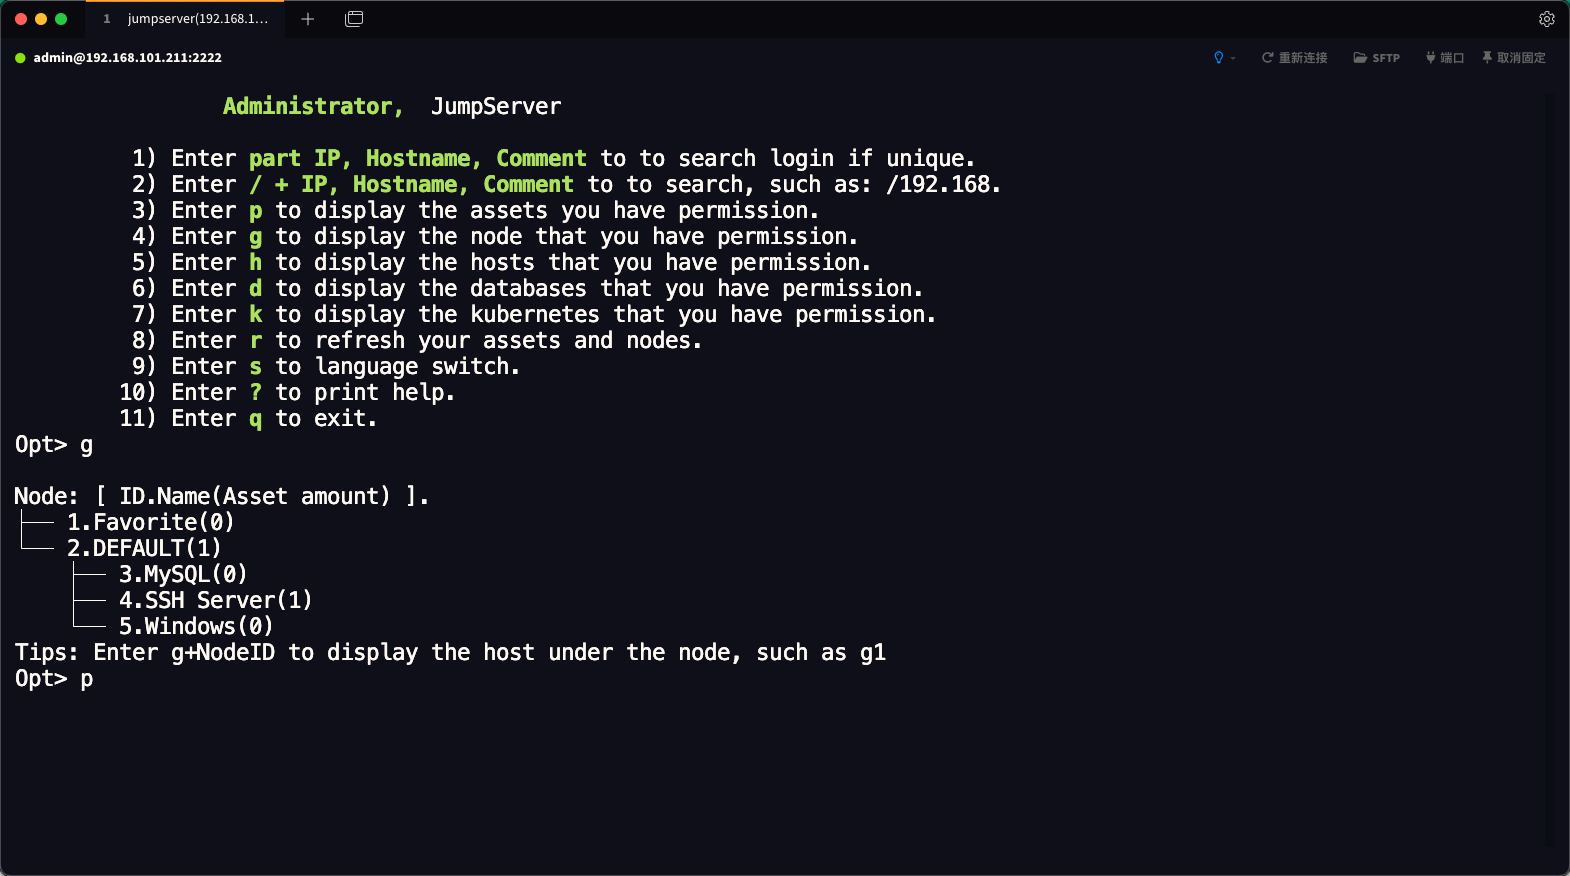
补充说明:账号和密码是JumpServer平台的账号,而不是服务器的账号和密码。
可以输入p列出被授权的资产列表,通过输出ID进行选择资产连接,如下图所示:
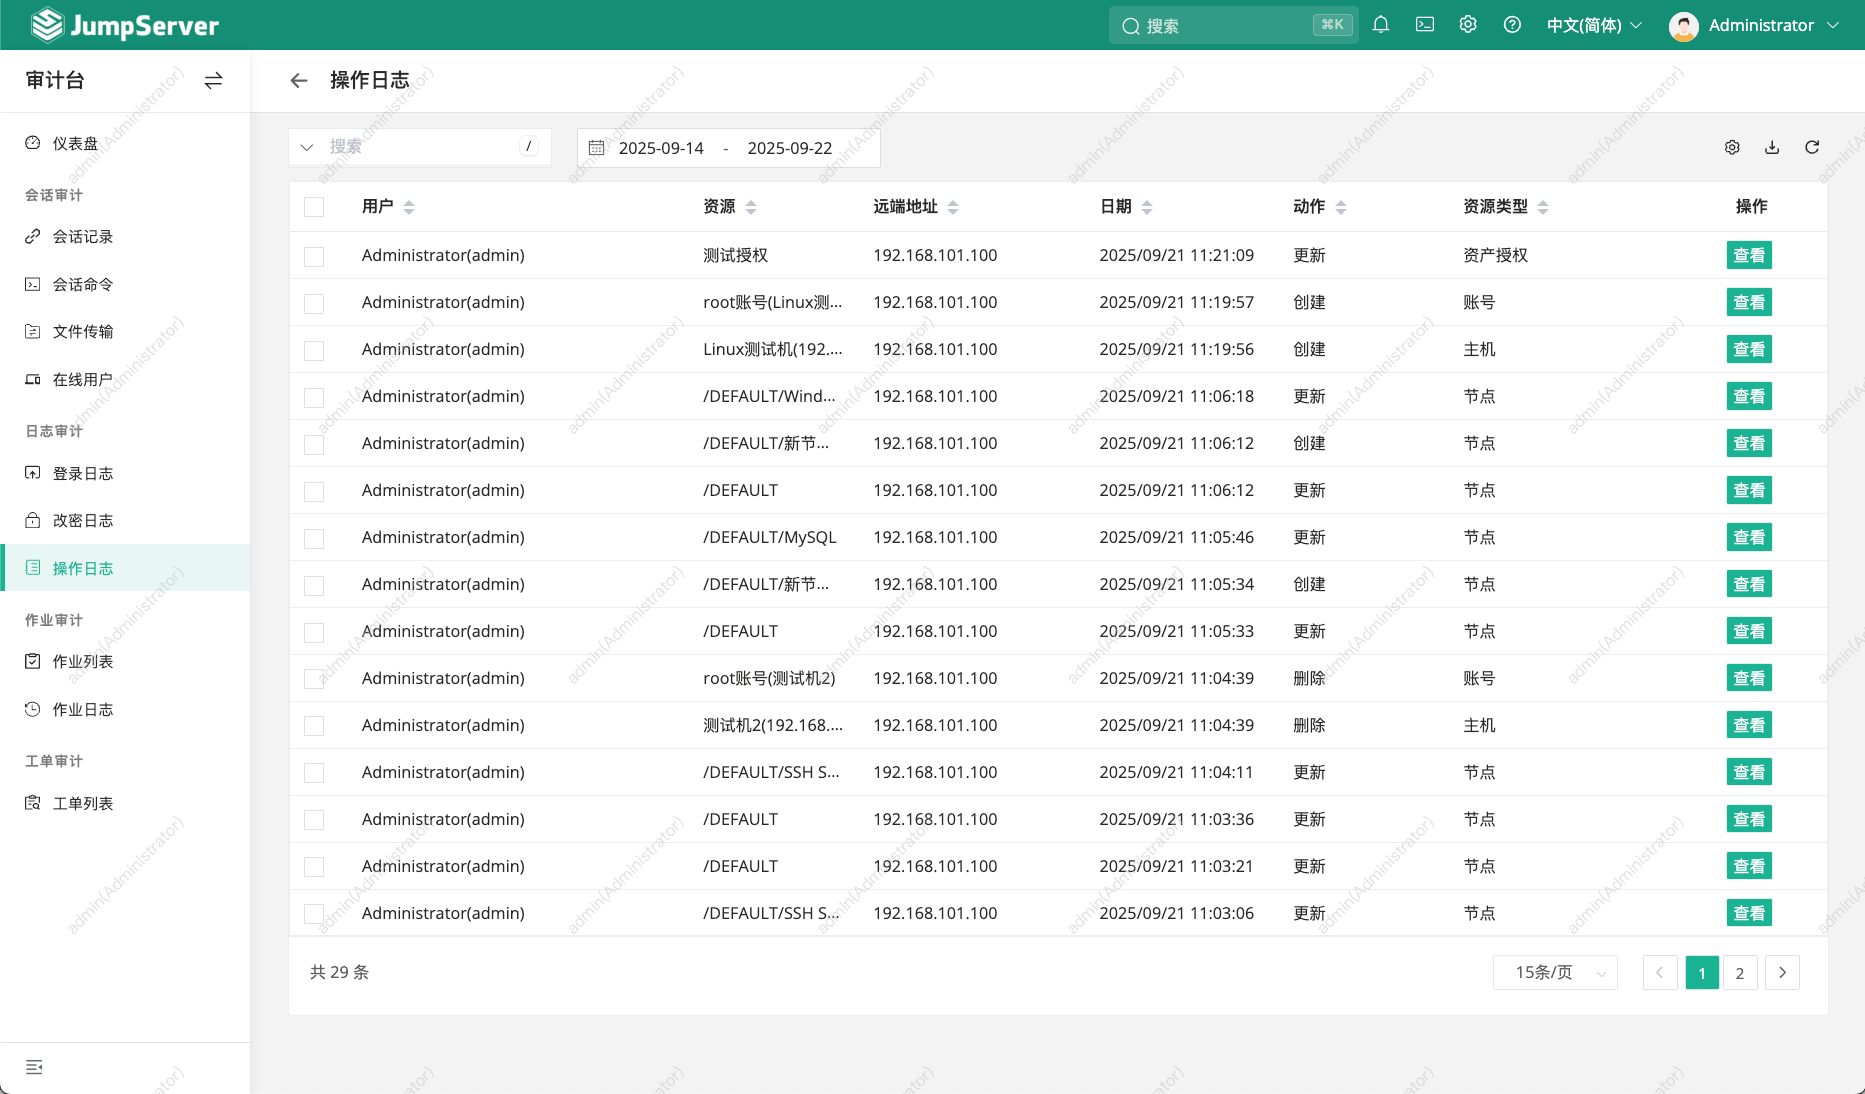
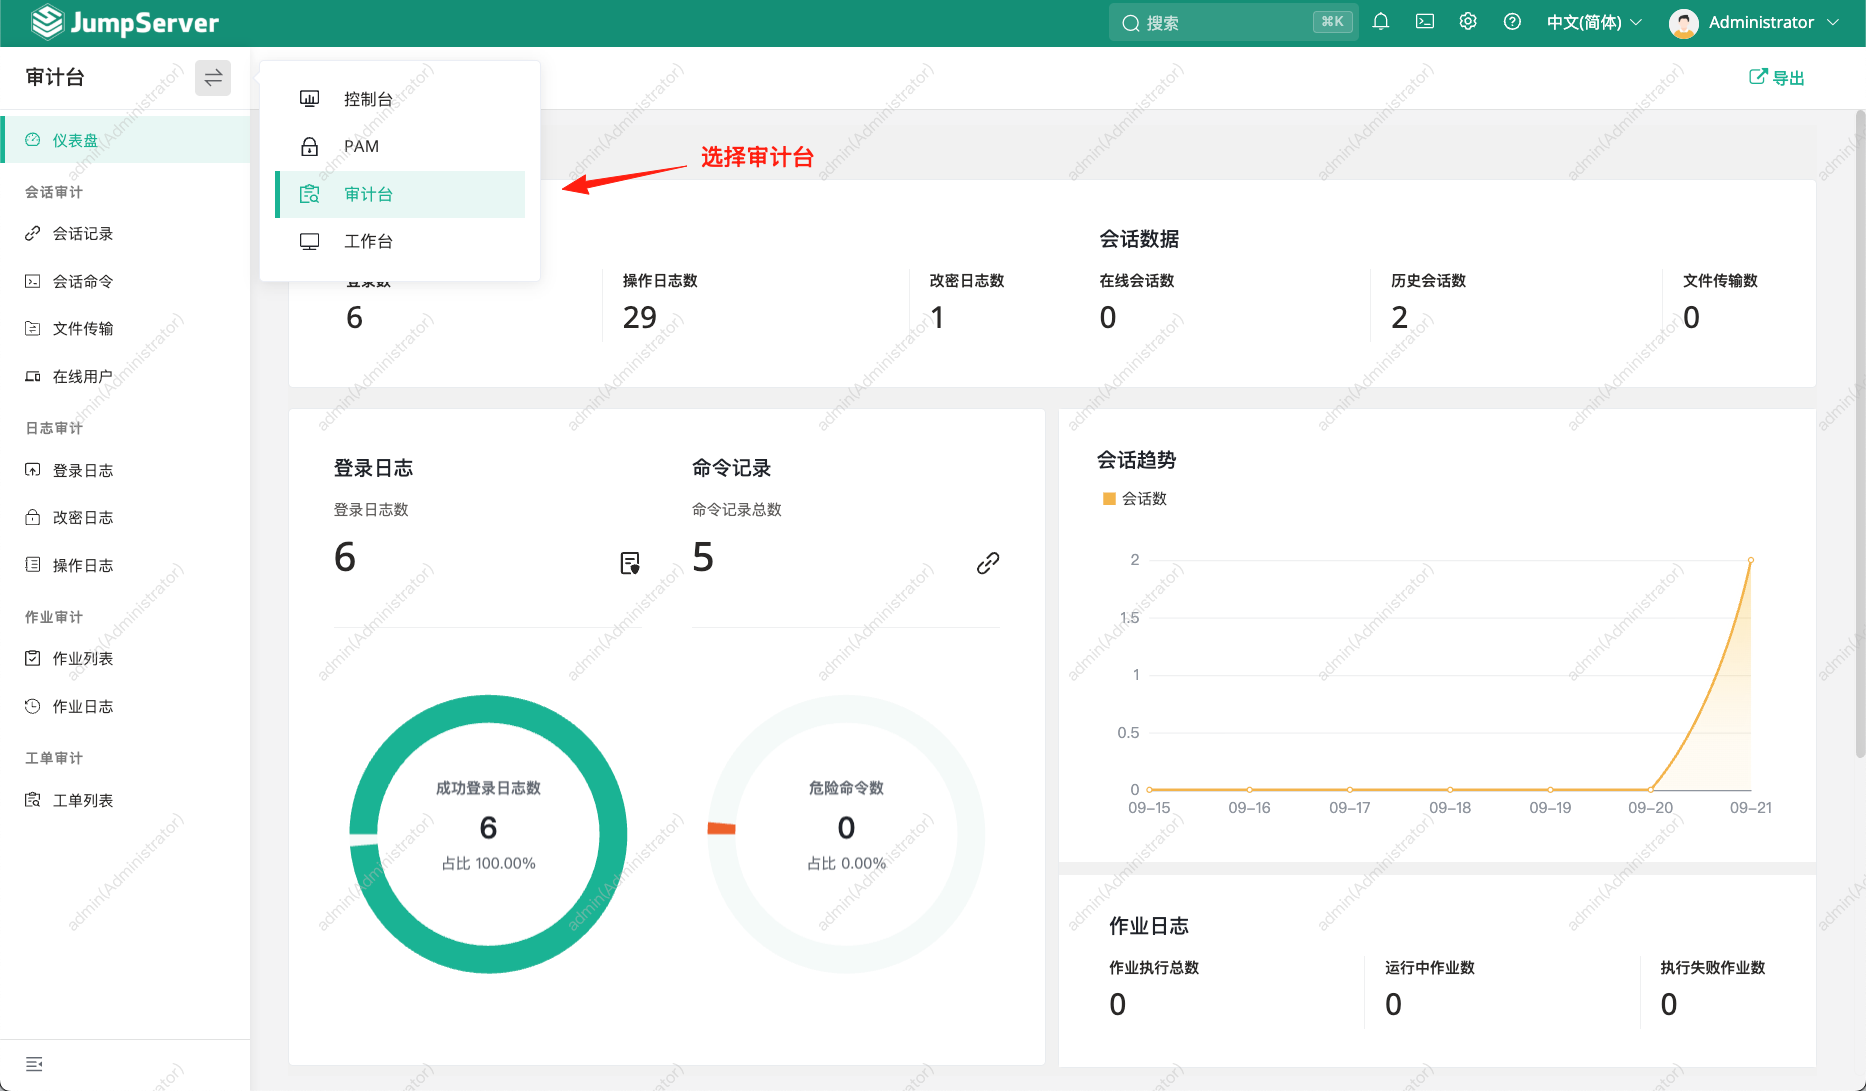
安全审计
可以通过审计平台来对某某账号的操作进行记录,可以查看会话记录、会话命令、登录日志、操作日志等进行审计。
先切换到审计平台,如下图所示:
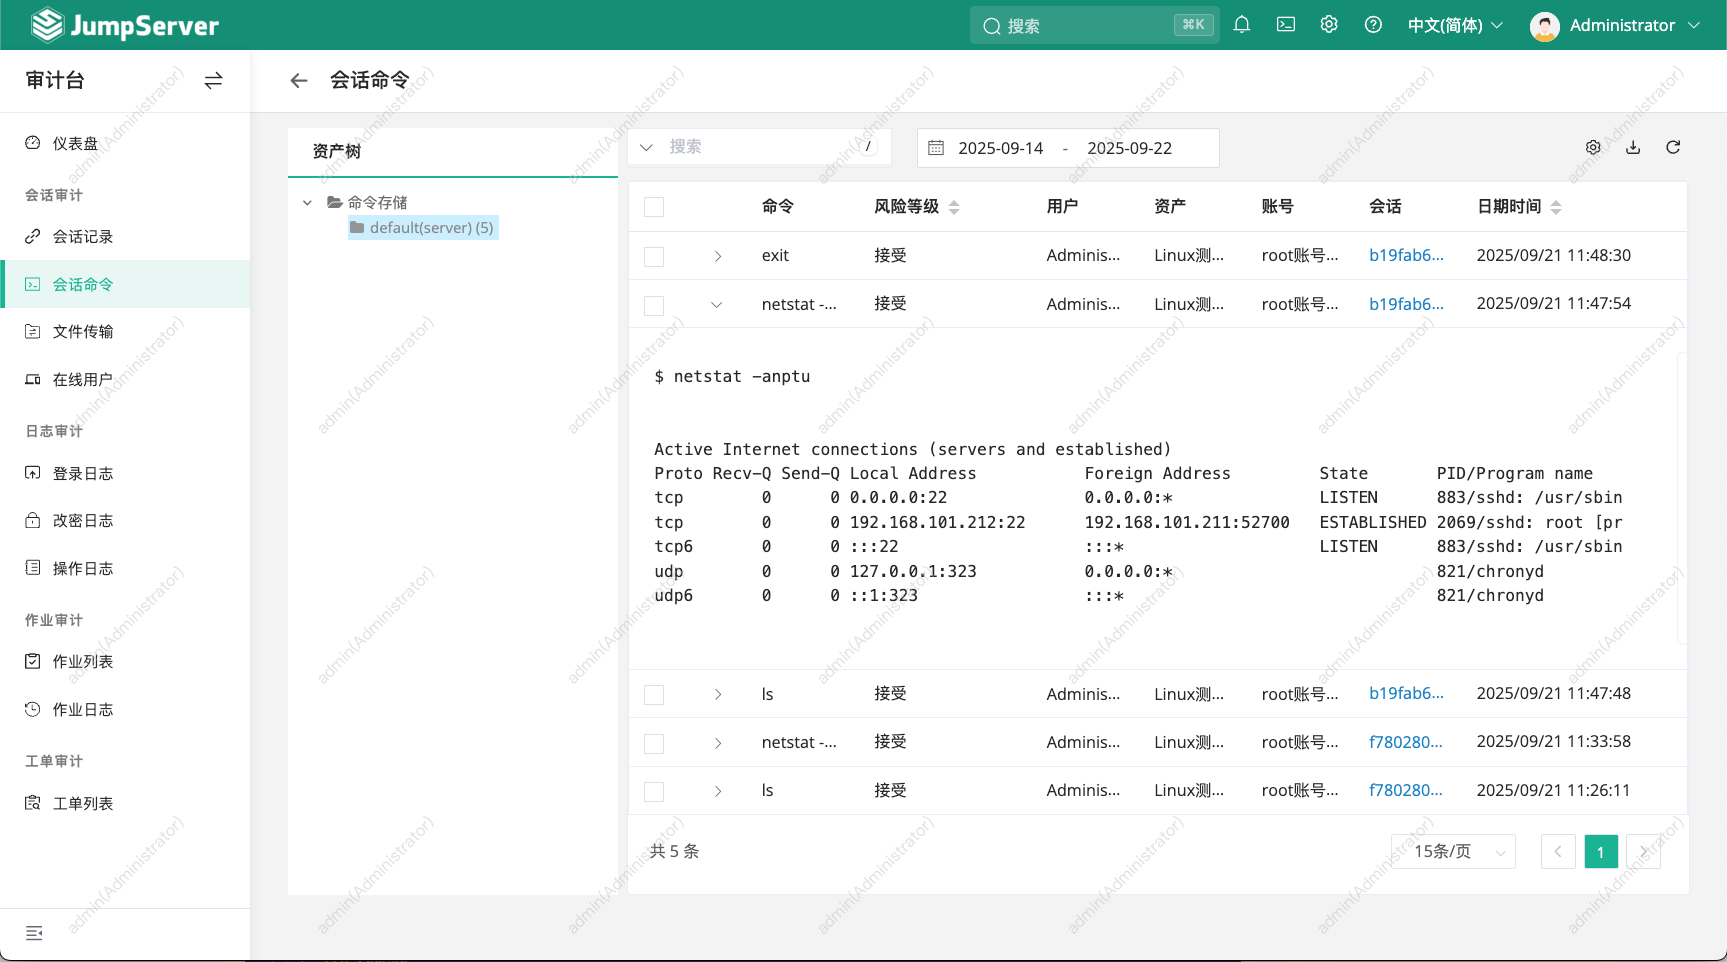
我们可以在会话命令中在终端中的命令操作记录,如下图所示:
还可以在操作日志中查看所示有的操作记录的日志,如下图所示: